


I just finished my muslin, readers, and that little voice inside is already asking, Do we really have to do this all over again in faux fur?
I wasn't going to make a muslin at first, but since most of the major seams will be done hinge-seam style (more about that later), as per Kenneth King's instructions, I won't be cutting seam allowances. I wanted to make sure this coat was going to fit. Thankfully, it does, and there's a very comfortable amount of ease. I made this with some cheap, coarse purple cotton I had in my stash.
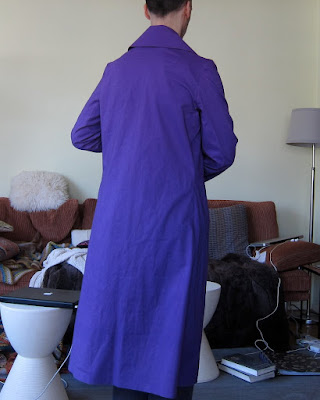
From the back, with undercollar up.

Collar down. I removed the back pleat.
Straight front without belt.

I only added the facing to the right side (which you see folded on top); on the left side you're just looking at the front piece only, but you get the idea. The only challenge was the notched collar -- if you've ever made one you know why: all those seams intersecting at that one little dot and all the careful clipping of seam allowances required.
I'm uncertain about the length the coat should be. Believe it or not, this is the intermediate length -- it could have been a maxi coat. I do love this pattern!

Meanwhile, I've amassed all my recommended tools, face mask included -- you don't want to inhale all those hair fragments and dust (Kenneth King recommends using one) -- and started experimenting with the fur. Below I am also armed with my hair clippers, which I'll use to trim seam allowances on the collar and facings; those won't have hinge seams.

Here are some of my other tools, including awl (that pointy, pin-like thing), afro pick and assorted combs, and cold tape.

The cold tape is a sturdy, highly adhesive fabric tape that's used to stay fur seams. It will be added to the top seam edges before I stitch. I found a roll at Greenberg & Hammer, the notions store, before they closed.

A basic seam is stitched right sides (i.e fur sides) together, with the reinforced seam on top. Before stitching, you use your pick to push as much fur as you can into the seam.
Then you zigzag along (falling slightly off) the edge, like overcasting, and gently pull the two sides apart so that the seam lies flat. ( I'm doing project this on my Kenmore 158.141, the one in the table.)

After a little combing, the seam is invisible from the front.

If you don't push the fur out of the seam first, you end up with something like this. Bad.

BTW, a regular straight stitched seam, without any trimming at all, would look like this -- a mess.

Of course, another necessary tool is a vacuum cleaner. Working with this fur creates a lot of loose hair along cut edges. Here's a seam allowance I shaved with my clippers. See all that hair? This is not a project for the anal compulsive.


My fur, while not the shaggiest out there, is much trickier to deal with than the plush fur in my Salvation Army coat from yesterday. Look how much shorter the nap is on that -- more like polyfleece.

Friends, if truth be told, I'm a little anxious about getting started but I'm trying to breath deeply (through my face mask, of course) and relax. It's not sable, after all.
A happy Friday to you all!


0 comments:
Post a Comment