malepatternboldness2

  • Subscribe to our RSS feed.
  • Twitter
  • StumbleUpon
  • Reddit
  • Facebook
  • Digg

Monday, February 7, 2011

Men's Shirt Sew-Along 7 -- Let's get our collar on!

Posted on 6:28 AM by dvdsvdsdv


Friends, today is a very big day in our Men's Shirt Sew-Along.  We have a lot to cover so let's get to it!

Our goals today are:

1. Craft our button loop

2. Attach our collar and button loop to neckline

3. Attach facings/inside back yoke piece

4. Stitch back yoke closed

1. What can I say about the button loop?  The directions Sarai has provided are clear, it's just a matter of doing it.  I use a loop turner, you can use a safety pin -- there are many ways to turn that button loop.  Depending on your fabric, the loop may turn easily or require extensive massaging.  You're pulling the top of the loop through the cylinder of fabric in order to turn the whole thing right side out. Give it a try and be patient.  It may take a few tries.


I don't press my loop; I want it to remain tube-like.  Put it aside for the time being.

Now on to the collar.

2.  A few things about stitching the collar to the neckline.  It must be centered, with notches lining up.  We'll be basting it to the front sides and outer back yoke, which we attached yesterday.  When in doubt, take a measuring tape or ruler and measure: is the center of the collar at the center of your yoke?  Does the collar edge of each side end at the small circle -- the one you copied from the pattern piece, remember? -- which on the left side is next to a larger circle (marked "loop" on the pattern piece)?  The collar must not extend past these small circles.

If you interfaced the upper collar, make sure that's the side that's facing up.  My inner collar is gingham, my outer collar is the blue and white pattern, so it was clear.


Baste your collar to the neckline, stitching at 3/8", and then attach your loop at the large circle on the left side.


3.  Now things get harder to illustrate so please pay attention.  Please read the instructions carefully first.

We are now going to attach our inner back yoke/front facings unit to what we've just completed.

Make sure you understand what we're about to do and why.  The collar we've just attached to the outer back yoke and right and left front has raw edges.  We want to enclose those raw edges between our facings and the inner back yoke.   That's what those facings are for. 

First, with RIGHT SIDES TOGETHER, pin the whole megillah together:  we're talking front facings pinned to left and right shirt fronts (illustrated on p. 14 of the instructions), continuing up and along the facing extensions (the parts of those facings that curve and jut out) and then across to the inside back yoke (at the neckline) and down the other side.  These are many layers of fabric.  Pin carefully.  Poke around under the layers to see what's what.

OK, so here is one of my facings pinned.


The curved upper part of the the facing gets pinned on the top of the collar.  My thumb is where the facing extends to cover the raw edge of the collar. 


Look at the upper corner of the facing -- on the left side you will see the button loop and the edge of the collar.  Check the other side too.


When you're done pinning, it should look like this:


Breathe.  Do you see what's going on here?  We're stitching around the entire neckline as well as down the facings.  When you turn down the inner back yoke and facings, the raw edge of collar and button loop will be fully enclosed.  The rest of the inner back yoke will be free and floppy.  (Sorry about that!)

When you're ready, stitch slowly at 5/8".  Stop often and reposition your various layers (with your sewing needle in the down position) to avoid puckering.   If you run into problems, rip the seam out and try again.  I found this part to be the most difficult of all.  Some may want to start at the center and work your way out to each edge and then, separately, down the vertical front facings.  Do what is easiest for you.


If you flip the inner back yoke down it should look like this:


Clip the collar seam down to reduce bulk and clip curves where necessary.


You can also clip the corners of your facings and facing seam allowances (we'll cover that again tomorrow).


4.  Finally, we want to attach the inner back yoke to the shoulder seam.  In the photo below, I am holding the inner back yoke in my hand (with the seam allowance folded up) and the shoulder seam is below it on the left.


In the next photo, I've matched the edges with my hand: you'll be stitching the inside yoke to the shoulder at 5/8".  Turn the seam allowance under to match the seam allowance of the shoulder seam (this is the seam that connects outer back yoke to right and left fronts).


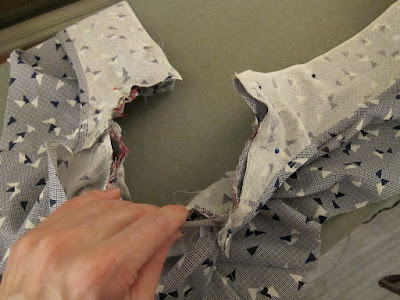
Again, we're going to attach the shoulder seam of the inner yoke from underneath (wrong side up).  Please review the instructions (p. 15).   NOTE: The instructions state "You will not be able to stitch all the way to the neckline." This is true.  If that eensy gap (where my finger is poking) bothers you, you can stitch it up by hand.


Breathe.  How does it look?

Now one last step (pp. 16-17).  We're going to stitch the inner back yoke down.  We do this by rolling the rest of the shirt between the inner back yoke and the outer back yoke.   You'll want to start by rolling the back up toward the yoke seam.  You'll make what looks like a big burrito.  Do not eat.


Stitch the yoke bottoms together at 5/8". 


Turn right side out (you can pull the right and left fronts out from their respective sides) and TA DA!


Kids, if you're still with me, give yourself a big hand (heck, throw in a foot).  If you're not, don't worry, you'll get there.

If you have questions, review the instructions and illustrations, and ask me either here or on our Flickr group.

The worst is behind us.

Breathe!
Email ThisBlogThis!Share to XShare to FacebookShare to Pinterest
Posted in Men's Shirt Sew-Along | No comments
Newer Post Older Post Home

0 comments:

Post a Comment

Subscribe to: Post Comments (Atom)

Popular Posts

  • Men's Shirt Sew-Along 17 -- Penultimate Post and Negroni 3 REVEAL!
    Loyal Sew-Alongers, Sew-Alongettes, and others, it's nearly time to say good-bye to our first-ever MPB Men's Shirt Sew-Along. The pa...
  • Requisite Halloween Post
    I don't think it's too early, do you? I recognize Halloween is a subject of relevance only to Americans (or so I believe); my apol...
  • The Last Toggle Post
    Dear readers, a million thanks for yesterday's comments.  I think we're all going to enjoy wearing this coat and don't think I...
  • MPB Men's Boxers Sew-Along 3 -- Let's Start Sewing!
    Good morning, Sew-Alongers and others eager to learn how to make boxers.  Today we are going to start sewing!  Yesterday I neglected to ment...
  • Behold the Refinished Featherweight Table!
    Friends, I simply couldn't wait till 2012 to show you my refinished Singer Featherweight table, which I fished out of the trash only one...
  • Shirt collar-palooza and the 1939 men's shirt
    Good morning, shirt mavens and others!  Here at Male Pattern Boldness , we're busy.  So busy in fact that my staff is demanding time-and...
  • The Wacky World of Color Forecasting
    Before I get started, why does current fashion illustration make women look like Bratz dolls?  I don't like it one bit. Moving right alo...
  • Can you see my butt crack?
    Readers, today I'm going to challenge your sense of decorum and tolerance.  The easily offended might want to come back tomorrow. Oh wis...
  • Doing Alterations for Others - Yea or Nay?
    Like many home sewers, I'm not into altering other people's clothes.  Heck, I don't even like to alter my own!  (Though, ironica...
  • Happiness is a Clean Sewing Table
    This may not look like anything to brag about to you, neat readers, but for me this is as good as it gets.  I can actually see the table und...

Categories

  • 20s glamour
  • 30s glamour
  • 40s glamour
  • 50s glamour
  • 60s glamour
  • 70s
  • age and aging
  • beauty
  • body art
  • books
  • button loops
  • Cathy
  • clothing and culture
  • completed projects
  • contests
  • crinoline
  • Daily Ditch (The)
  • decluttering
  • dime store psychology
  • dogs
  • dolls
  • Doris Day
  • fabric
  • fashion show
  • faux fur
  • flea market
  • Ginger Rogers
  • Guy week
  • Hats
  • interfacing
  • ironing
  • Jeans Sew-Along
  • Kenmore 158.1040
  • makeovers
  • Men's Boxers Sew-Along
  • men's fit issues
  • Men's Shirt Sew-Along
  • mens bathing suit
  • mens fashion
  • mens grooming
  • mens jeans
  • mens pajamas
  • mens pants
  • mens patterns
  • mens shirt
  • mens suit
  • mens toggle coat
  • mens underwear
  • mens western jacket
  • modeling
  • mothers
  • movies
  • MPB Day
  • my life
  • pattern drafting
  • patterns
  • Peter on video
  • Pfaff 30
  • project planning
  • sergers
  • sewing and culture
  • sewing basics
  • sewing machines
  • Shoes
  • shopping
  • singer 15-90
  • Singer 15-91
  • Singer 201
  • Singer 66
  • Singer 99K
  • Singer Featherweight
  • Singer treadle
  • topstitching
  • video
  • women I love
  • works in progress
  • YEA or NAY?

Blog Archive

  • ►  2012 (35)
    • ►  February (16)
    • ►  January (19)
  • ▼  2011 (313)
    • ►  December (24)
    • ►  November (25)
    • ►  October (20)
    • ►  September (29)
    • ►  August (21)
    • ►  July (24)
    • ►  June (22)
    • ►  May (30)
    • ►  April (28)
    • ►  March (31)
    • ▼  February (28)
      • More Shirts, More Dolls -- Wow!
      • Doll talk + Cathy's Comeback muslin!
      • When Ken Met Allan or "Guys and Dolls"
      • How Much For A Vintage Pattern or "10 bucks -- for...
      • BREAKING -- We interrupt this crinoline...
      • Crinoline confessions for a Wednesday morning
      • Taffeta, tulle, and the big, BIG dress
      • Men's Shirt Sew-Along 18 -- So Long, Sew-Along + T...
      • Men's Shirt Sew-Along 17 -- Penultimate Post and N...
      • Saturday Smorgasbord with a side of Sew-Along
      • Men's Shirt Sew-Along 16 -- New and Final Negroni ...
      • New Acquisitions: Insomnia Edition
      • Men's Shirt Sew-Along 15 -- Addressing FIT: The Sl...
      • Men's Shirt Sew-Along 14 -- Addressing FIT
      • Men's Shirt Sew-Along 13 -- A new collar for Negro...
      • Men's Shirt Sew-Along 12 -- A new collar for Negro...
      • Men's Shirt Sew-Along 11 -- A new collar for Negroni!
      • Shirt-free Friday + parrot video!
      • Men's Shirt Sew-Along 10 -- Finishing Up!
      • Men's Shirt Sew-Along 9 -- Side seams and cuffs!
      • Men's Shirt Sew-Along 8 -- Sleeves, etc.
      • Men's Shirt Sew-Along 7 -- Let's get our collar on!
      • Men's Shirt Sew-Along 6 -- Putting it together, bi...
      • Men's Shirt Sew-Along 5 -- Collars and Cuffs and (...
      • Men's Shirt Sew-Along 4 -- The Placket Racket
      • Men's Shirt Sew-Along 3 -- Pockets, Plackets and P...
      • Men's Shirt Sew-Along 2 -- Cut it out already!
      • Men's Shirt Sew-Along 1 -- Let's get started!
    • ►  January (31)
  • ►  2010 (152)
    • ►  December (30)
    • ►  November (27)
    • ►  October (31)
    • ►  September (30)
    • ►  August (23)
    • ►  July (11)
Powered by Blogger.

About Me

dvdsvdsdv
View my complete profile