malepatternboldness2

  • Subscribe to our RSS feed.
  • Twitter
  • StumbleUpon
  • Reddit
  • Facebook
  • Digg

Saturday, May 14, 2011

Jeans Sew-Along 10 -- How to Make a Button Fly!

Posted on 5:31 AM by dvdsvdsdv


Much to cover today so let's get to it.  The best way to create a button fly is to look at a pair of RTW jeans and recreate one.

The button fly is essentially an additional fly shield sewn atop the left front fly extension.   From now on I will refer to this as the left fly buttonhole shield.


Remember these?  They are our right and left fly extensions as viewed from the wrong side (inside) of the pants.   (The left fly extension edge is serged; the right side will be stitched and then serged to the right fly shield.)   They are folded back at the center of your pants fronts, which you traced off your pattern piece -- or should have.


If you're unsure how I got to this point, please refer to your instructions or review last week's fly post.  Everything is the same up until the zipper installation.

I made the left fly buttonhole shield using the zipper shield pattern piece from Kwik Sew 3504, but instead of cutting it with the curved side on the fold, I did the opposite.


We want the straight edge to be a simple fold.  The side that's curved at the bottom will be serged (or overcast) and will face away from the fly.


I reinforced (or interfaced) the left fly buttonhole shield with an additional fly-shaped piece (not cut on the fold) cut perpendicular to the selvage to prevent stretching (width-wise).  With this extra fly-shaped piece inside, I then serged the curved edge.  So we're talking THREE layers of denim, two parallel to the selvage and one perpendicular.  If my denim hadn't had stretch, two layers might have been sufficient.


We want to prevent this from ever happening:


Next, I measured my left fly buttonhole shield against my RTW button fly and marked where the buttonholes should go.  Then with my Singer buttonholer attachment I made three holes.


I reinforced the holes with Fray Check, cut them open, and then stitched the left fly buttonhole shield to the left fly extension (and not through the front of the pants) along the outer curved edge.  You need to make sure the left fly buttonhole shield does not stick out beyond the front edge of the fly.  Remember how the front left fly edge is topstitched?  Keep the straight (outer) edge of the shield inside that topstitching line.


From the inside it now looks like this:


I staystitched the top.  From the outside it looks like this:


I now topstitched the left front fly (through all left layers), exactly as I did when I made my zipper fly (see Kwik Sew instructions for details).  Make sure that when you're topstitching, you're clear of the buttonholes themselves.  You can make a single row or double row of topstitching, as you prefer (Most RTW jeans have a double row).


Now let's address the right fly.

You're going to attach the right zipper shield just the way you would have if you'd sewn in a zipper, trimming the edge of the right fly extension (the piece that's part of the right front pants and folded back) at slightly less than half, and attaching the right fly shield, which you've created exactly the way you did for the zipper fly.


Recall that, with the right fly shield, the curved edge is the one cut on the fold, and the straight edge is raw (and will be serged) -- exactly the opposite of the left fly buttonhole shield.


I stitched and serged the right fly shield to the trimmed edge of the right fly extension.  I then topstitched this along the vertical front edge from the front, exactly as I would if I'd attached a zipper.  (Instead of a zipper, you'll be attaching jeans buttons.)  Refer to the Kwik Sew instructions if you're unsure of how to do this.


From the inside, the right front fly extension should extend to the edge of the left fly buttonhole shield.  Mine does not quite reach -- next time I'll make my left fly buttonhole shield a little narrower.  I may still trim that extra width.  (With white denim these details can be visible from the outside; not the case with dark denim.)


Even with RTW jeans, there's often extra width on the left fly buttonhole shield.


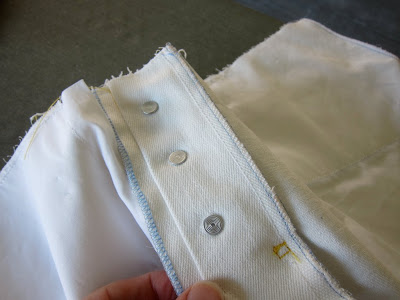
Lining up left fly buttonhole shield and right fly extension, I marked with pencil where I needed my small jeans buttons to go and attached them.


Here's how the fly looks buttoned:


And from the inside. 


Finally, you'll want to stitch the bottoms of the two shield together and bartack through all layers.


The pant are almost done -- just need to stitch up the sides and add a waistband.  He likes them!


Oh -- I haven't even mentioned my new sewing machine yet!  More about that tomorrow (short story: $20 on Craigslist) but here's a peek. 

LOVE!


Name the model and win a prize.

As always, leave your questions (rhetorical or otherwise) and comments below.

Have a great day, everybody!
Email ThisBlogThis!Share to XShare to FacebookShare to Pinterest
Posted in Jeans Sew-Along | No comments
Newer Post Older Post Home

0 comments:

Post a Comment

Subscribe to: Post Comments (Atom)

Popular Posts

  • Men's Shirt Sew-Along 17 -- Penultimate Post and Negroni 3 REVEAL!
    Loyal Sew-Alongers, Sew-Alongettes, and others, it's nearly time to say good-bye to our first-ever MPB Men's Shirt Sew-Along. The pa...
  • Requisite Halloween Post
    I don't think it's too early, do you? I recognize Halloween is a subject of relevance only to Americans (or so I believe); my apol...
  • The Last Toggle Post
    Dear readers, a million thanks for yesterday's comments.  I think we're all going to enjoy wearing this coat and don't think I...
  • MPB Men's Boxers Sew-Along 3 -- Let's Start Sewing!
    Good morning, Sew-Alongers and others eager to learn how to make boxers.  Today we are going to start sewing!  Yesterday I neglected to ment...
  • Behold the Refinished Featherweight Table!
    Friends, I simply couldn't wait till 2012 to show you my refinished Singer Featherweight table, which I fished out of the trash only one...
  • Shirt collar-palooza and the 1939 men's shirt
    Good morning, shirt mavens and others!  Here at Male Pattern Boldness , we're busy.  So busy in fact that my staff is demanding time-and...
  • The Wacky World of Color Forecasting
    Before I get started, why does current fashion illustration make women look like Bratz dolls?  I don't like it one bit. Moving right alo...
  • Can you see my butt crack?
    Readers, today I'm going to challenge your sense of decorum and tolerance.  The easily offended might want to come back tomorrow. Oh wis...
  • Doing Alterations for Others - Yea or Nay?
    Like many home sewers, I'm not into altering other people's clothes.  Heck, I don't even like to alter my own!  (Though, ironica...
  • Happiness is a Clean Sewing Table
    This may not look like anything to brag about to you, neat readers, but for me this is as good as it gets.  I can actually see the table und...

Categories

  • 20s glamour
  • 30s glamour
  • 40s glamour
  • 50s glamour
  • 60s glamour
  • 70s
  • age and aging
  • beauty
  • body art
  • books
  • button loops
  • Cathy
  • clothing and culture
  • completed projects
  • contests
  • crinoline
  • Daily Ditch (The)
  • decluttering
  • dime store psychology
  • dogs
  • dolls
  • Doris Day
  • fabric
  • fashion show
  • faux fur
  • flea market
  • Ginger Rogers
  • Guy week
  • Hats
  • interfacing
  • ironing
  • Jeans Sew-Along
  • Kenmore 158.1040
  • makeovers
  • Men's Boxers Sew-Along
  • men's fit issues
  • Men's Shirt Sew-Along
  • mens bathing suit
  • mens fashion
  • mens grooming
  • mens jeans
  • mens pajamas
  • mens pants
  • mens patterns
  • mens shirt
  • mens suit
  • mens toggle coat
  • mens underwear
  • mens western jacket
  • modeling
  • mothers
  • movies
  • MPB Day
  • my life
  • pattern drafting
  • patterns
  • Peter on video
  • Pfaff 30
  • project planning
  • sergers
  • sewing and culture
  • sewing basics
  • sewing machines
  • Shoes
  • shopping
  • singer 15-90
  • Singer 15-91
  • Singer 201
  • Singer 66
  • Singer 99K
  • Singer Featherweight
  • Singer treadle
  • topstitching
  • video
  • women I love
  • works in progress
  • YEA or NAY?

Blog Archive

  • ►  2012 (35)
    • ►  February (16)
    • ►  January (19)
  • ▼  2011 (313)
    • ►  December (24)
    • ►  November (25)
    • ►  October (20)
    • ►  September (29)
    • ►  August (21)
    • ►  July (24)
    • ►  June (22)
    • ▼  May (30)
      • Ten things I learned making a 1940's midriff
      • Cathy models the 40's midriff or "Sweetheart of th...
      • More midriff madness!
      • "Oops, I did it again!" or Peter's Latest Vintage...
      • Friday Forties Midriff Madness!
      • Reflections on My Second Year of Sewing
      • Feel the Fear...and Serge it Anyway!
      • Do You Suffer From Serger-phobia?
      • Midriffs and other Monday Musings
      • Roads Not Taken
      • Peter in Pajamas!
      • Pajama Games
      • Pajama Party Tonight!
      • FASHION POLICE 101 or "How to Tell Someone You Lov...
      • Whatever Happened to Twenties Style?
      • A Day of Rest
      • So Long, Sew-Along -- Peter & Michael's White Jean...
      • Jeans Sew-Along 10.5 -- Rivets FAIL + Gifts Galore!
      • Jeans Sew-Along 10 -- How to Make a Button Fly!
      • (Nearly) Jeans-Free Friday!
      • Jeans Sew-Along 9 -- Plodding along + CONTEST WINNER!
      • Jeans Sew-Along 8 -- Starting all over again!
      • NEWS FLASH: We interrupt this Sew-Along...!
      • Jeans Sew-Along 7 -- Finishing up!
      • Jeans Sew-Along 6 -- The Bodacious Backside
      • Jeans Sew-Along 5 -- The Fly
      • Jeans Sew-Along 4 -- Front Pockets
      • Jeans Sew-Along 3 -- Seams
      • Jeans Sew-Along 2 -- Fit
      • Jeans Sew-Along 1 -- Getting Started!
    • ►  April (28)
    • ►  March (31)
    • ►  February (28)
    • ►  January (31)
  • ►  2010 (152)
    • ►  December (30)
    • ►  November (27)
    • ►  October (31)
    • ►  September (30)
    • ►  August (23)
    • ►  July (11)
Powered by Blogger.

About Me

dvdsvdsdv
View my complete profile