


Good morning, Sew-Alongers and Sew-Along bench-sitters! I don't think I told you yet, but I'll be sewing two pairs of jeans in our Jeans Sew-Along: white denim jeans with a zipper fly and dark blue denim jeans with a button fly.
I've been wanting white jeans for a while now even though I'm a bit of a slob. We'll see how that works out. Do you like men in white jeans?
Today I want to focus on seams. The Kwik Sew 3504 pattern instructions calls for most seams to be double-topstitched rather than flat-felled, so I thought I'd show you the difference. First, though, today's goals.
Our goals for today are:
1. Having made our pattern adjustments, start cutting our fashion fabric.
2. Choose and cut pocket fabric.
3. Practice our jeans stitches: flat-felling or double-topstitching, overcasting and/or serging seam allowances.
****
1. It's time to start cutting. I know some of you who are between sizes (e.g., Small and Medium) aren't sure which size to cut. I'd always err on the side of too large. You can always make modifications as you stitch and try on; you can't make something larger if you've cut it too small.
IF you're using stretch denim, however, and prefer a snug fit, you may prefer to cut the smaller size. The first time sewing with a new pattern is a journey into the unknown to some extent. That's why we make muslins. BTW, to make a jeans muslin, all you really need to make is the equivalent of shorts. It's the fit from waist to thigh that needs precise fitting. The only adjustment I've made is to shorten the rise by 1/2". I'm keeping my fingers crossed.
Having pre-shrunk my denim, I ironed it. Remember when I said my denim had no stretch? I was wrong. This denim has some lycra in it and I'll just have to deal with it. If you're sewing stretch denim, try not to stretch it as you sew or the seams won't lie flat.

IMO, it's not worth trying to cut two layers of denim at the same time -- the bottom layer too often ends up off grain. It takes just a few minutes extra to cut all the layers separately; there aren't that many pattern pieces with jeans.
What's nice about denim is that you can generally find the grain very easily and line up your pattern piece accordingly.

It took about an hour or so, but I got everything cut out. (I use an Olfa rotary cutter and self-healing mat on the floor.)

2. Yesterday I also chose my pocketing fabric. I'm using a leftover piece of shirting from the Men's Shirt Sew-Along -- sturdy, quilt-weight cotton. For jeans pockets I usually use shirting, either 100% cotton or a blend. I avoid flannel, which doesn't hold up as well, in my experience. Whatever fabric you choose, remember to pre-shrink it (a good steaming may do the job if you don't want to do laundry again).

3. Now, on to stitching. We've been discussing denim/topstitching thread in the Jeans Sew-Along Flickr Group. For those who aren't familiar with it, topstitching thread is thicker than regular thread and (arguably) sturdier. Sometimes topstitching thread requires a sewing machine tension adjustment and we'll be talking more about sewing machine tension this week. I'm always surprised by how many sewists are terrified of adjusting tension on their machines. We need to get over this fear, my friends.
I'm going to serge most of my exposed seam allowances, and I changed the thread color and tested this out yesterday. All good. If you're not serging you'll want to overcast with a zigzag stitch along the raw edges of your seam allowances.

Now let's talk topstitching and flat-felled seams.
Remember how, in the Men's Shirt Sew-Along, we sewed our flat-felled seams with the fashion fabric right sides together? With jeans, we're going to do just the opposite: we'll be stitching our seams with the fabric WRONG SIDES TOGETHER. This is because we want the bulky side of the seam to appear on the outside of the jeans and not the inside. I flat-fell the inner leg seams, all the seams attaching the back yoke, as well as the seam down the middle of the seat. The outer leg seams I just stitch normally. If you inspect RTW jeans, they're generally done this way.
Kwik Sew 3504 does not call for flat-felling, but rather directs you to double-topstitch. A double-topstitched seam is sometimes called a "mock" flat-fell. From the outside, it is virtually identical to a flat-felled seam and it's very sturdy. Here's the difference:
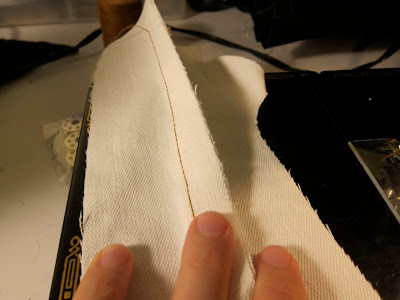
To create a true flat-fell, we're going to stitch our fabric together, WRONG SIDES TOGETHER, with our topstitching thread (or denim thread; I use these terms interchangeably). I use a medium-longish stitch for topstitching as I like the way it looks. If your not sure which stitch length to use, examine a pair of RTW jeans.

Now separate the two pieces and finger press. You should have two 5/8" seam allowances, right side up.
You're going to trim one seam allowance to approximately 1/4". You can do this with shears or a rotary cutter. Which seam allowance you choose to trim depends on which way you want the finished seam to lie. The seam attaching the back of the pants to the back yoke, for example, generally folds up toward the waistband on RTW jeans.

Now fold the longer side over the shorter side, encasing it. You can iron the seam flat if you care to.

Topstitch along the edge at approximately 1/8". Be careful not to fall off the seam edge! If you need better control on a zigzagger, you can use an edge guide foot if you have one.

Finished, it looks like this on the right side:

And like this on the wrong side. There are no exposed seam allowances to finish.

Now let's do a double-topstitched or mock flat-felled seam:
I sew my fashion fabric pieces together RIGHT SIDES TOGETHER -- the opposite of what we did for the true flat-felled seam. This seam will not be visible.

Now open your fabric wrong side up, and finger press, folding both seam allowances to one side. Next, turn your fabric right side up and topstitch along the seam, on the side which has both seam allowances folded beneath it, at approximately 1/8".

Then stitch a second line of topstitching, 1/4" from the first.

Right side up it looks identical to a flat-felled seam.

Wrong side up you have two seam allowances folded to one side. You can serge or overcast these to prevent fraying.

Again, from the outside, these seams look identical. If you find trimming flat-felled seams too challenging or labor-intensive, or if your fabric is too thick or spongy to handle it, do the double-topstitch. It's your call. When I made my leopard-print cotton velvet jeans, I double-topstitched.

Decorative seams like those along the pocket edges should be double-topstitched of course: flat-felling is not an option.
Friends, that's it for today. I hope this is clear. If you have any questions about these techniques, just ask. Tomorrow we'll start sewing for real.
Have a great day, everybody!


0 comments:
Post a Comment