malepatternboldness2

  • Subscribe to our RSS feed.
  • Twitter
  • StumbleUpon
  • Reddit
  • Facebook
  • Digg

Saturday, May 7, 2011

Jeans Sew-Along 6 -- The Bodacious Backside

Posted on 4:55 AM by dvdsvdsdv

Friends, believe it or not, we're past the mid-point in our jeans construction!  We've completed our front pockets and front fly.  It's time to do the ass backside.

Pick up any pair of RTW jeans and you'll notice that the back and back yokes are attached pretty much the same way: with flat-felled seams that fold up onto the yoke, and a center seam that folds to the right.   That's how we're going to do it now.


Our goals for today are:

1. Attach yokes to back and stitch back sides together

2. Create and attach back pockets

3. Sew inseam  

*****

1. We'll attach our back yokes with flat-felled seams (or double-topstitched seams if that's your preference).

If you're flat-felling, stitch one back piece and one yoke piece together, WRONG SIDES TOGETHER, since we want the bulky side (or topstitched side) of the seam to end up on top.  Make sure you match notches as these pieces can be easily confused/reversed.

Since we're folding this seam up, we want to trim the upper seam allowance and fold the lower one over it, encasing it:


You can press this seam with an iron or finger press it, whichever you prefer.  Now topstitch along the edge.  It should end up looking like this:


Now do the same thing on the other side:


We now have two back pieces with yokes attached.  It's time to sew them together, and we're going to do this using the same method we used above, joining the two pieces WRONG SIDES TOGETHER.


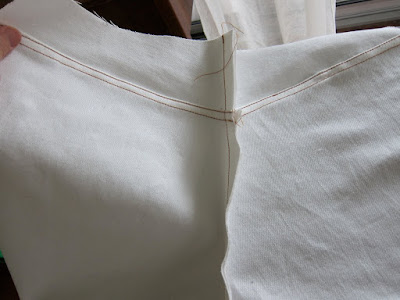
Trim the right seam allowance and fold the left over the right, encasing the right.


That lump, where the two back-and-yoke seams intersect, can be difficult to match and to stitch through.  We want the seams lined up as accurately as possible.

If this lump is too high for the clearance under your sewing machine foot, press or even hammer it down.  Some people use something called a Jean-a-ma-jig to help their presser foot climb over the thick seams, or they improvise with rolled up cloth or cardboard.  Do what works for you.  I find it helps if I walk the machine over this bump by turning the hand wheel myself.

Mine ended up looking like this, which I can live with:


2.  Now let's make our back patch pockets.  Nothing unusual about this, and the Kwik Sew instructions are clear.


I always use white glue to help hold down the folded edges.  What's most important here is that the two pockets end up identical.   I work on them side-by-side and match them up every step along the way.

First, fold the top edge over twice and double topstitch.


Next, fold in the sides at 5/8".  Remember: what's most important is that the two pockets look the same.  Again, I use white glue to hold down the edges and press with my iron.  If you're using stretch denim, try not to stretch these pieces out of shape.  Some people like using templates; I just eyeball it.


Now, place the two pockets on the back of the jeans in the position you prefer.  Some people like high pockets and some people like low pockets, others like fancy embroidery -- it's your call.  I just copy what my RTW jeans look like.  Measure carefully: the pockets generally do not line up with any of the other seams, but are slightly diagonal to them.

Double-topstitch the pockets in place (I use pins to secure their positions first; if this doesn't work for you, try a double-faced tape like Wonder Tape, which washes out and won't gum up your needle).


Here are my two pockets (I did these after I attached my waistband).  The top corners are good places for bartacks.


3. Now it's time to sew our inseams together with one long flat-felled seam.  Lay out your fronts and backs and pin first.  We'll be stitching with WRONG SIDES TOGETHER.


We're going to fold this seam toward the back side of the pants, so trim the further-back seam allowance (to approx. 1/4") and fold the longer seam allowance over the shorter, encasing it.  Pin, press, and stitch.


I found it easier to work my way out from the center inseam point and down each leg.  This is another place where a Jean-a-ma-jig could be helpful.  You're sewing through multiple flat-felled seams so it's a tricky area.  Don't sweat it if it isn't perfect.  Who's looking down there?


Friends, we can now try on our jeans by pinning the outside seams!  How's it looking?


That's it for today, folks.  We're nearing the end, can you believe it?

Don't forget to post your photos in our Jeans Sew-Along Flickr group, along with any questions or comments you may have.

Happy sewing, everybody!
Email ThisBlogThis!Share to XShare to FacebookShare to Pinterest
Posted in Jeans Sew-Along | No comments
Newer Post Older Post Home

0 comments:

Post a Comment

Subscribe to: Post Comments (Atom)

Popular Posts

  • Men's Shirt Sew-Along 17 -- Penultimate Post and Negroni 3 REVEAL!
    Loyal Sew-Alongers, Sew-Alongettes, and others, it's nearly time to say good-bye to our first-ever MPB Men's Shirt Sew-Along. The pa...
  • Requisite Halloween Post
    I don't think it's too early, do you? I recognize Halloween is a subject of relevance only to Americans (or so I believe); my apol...
  • The Last Toggle Post
    Dear readers, a million thanks for yesterday's comments.  I think we're all going to enjoy wearing this coat and don't think I...
  • MPB Men's Boxers Sew-Along 3 -- Let's Start Sewing!
    Good morning, Sew-Alongers and others eager to learn how to make boxers.  Today we are going to start sewing!  Yesterday I neglected to ment...
  • Behold the Refinished Featherweight Table!
    Friends, I simply couldn't wait till 2012 to show you my refinished Singer Featherweight table, which I fished out of the trash only one...
  • Shirt collar-palooza and the 1939 men's shirt
    Good morning, shirt mavens and others!  Here at Male Pattern Boldness , we're busy.  So busy in fact that my staff is demanding time-and...
  • The Wacky World of Color Forecasting
    Before I get started, why does current fashion illustration make women look like Bratz dolls?  I don't like it one bit. Moving right alo...
  • Can you see my butt crack?
    Readers, today I'm going to challenge your sense of decorum and tolerance.  The easily offended might want to come back tomorrow. Oh wis...
  • Doing Alterations for Others - Yea or Nay?
    Like many home sewers, I'm not into altering other people's clothes.  Heck, I don't even like to alter my own!  (Though, ironica...
  • Happiness is a Clean Sewing Table
    This may not look like anything to brag about to you, neat readers, but for me this is as good as it gets.  I can actually see the table und...

Categories

  • 20s glamour
  • 30s glamour
  • 40s glamour
  • 50s glamour
  • 60s glamour
  • 70s
  • age and aging
  • beauty
  • body art
  • books
  • button loops
  • Cathy
  • clothing and culture
  • completed projects
  • contests
  • crinoline
  • Daily Ditch (The)
  • decluttering
  • dime store psychology
  • dogs
  • dolls
  • Doris Day
  • fabric
  • fashion show
  • faux fur
  • flea market
  • Ginger Rogers
  • Guy week
  • Hats
  • interfacing
  • ironing
  • Jeans Sew-Along
  • Kenmore 158.1040
  • makeovers
  • Men's Boxers Sew-Along
  • men's fit issues
  • Men's Shirt Sew-Along
  • mens bathing suit
  • mens fashion
  • mens grooming
  • mens jeans
  • mens pajamas
  • mens pants
  • mens patterns
  • mens shirt
  • mens suit
  • mens toggle coat
  • mens underwear
  • mens western jacket
  • modeling
  • mothers
  • movies
  • MPB Day
  • my life
  • pattern drafting
  • patterns
  • Peter on video
  • Pfaff 30
  • project planning
  • sergers
  • sewing and culture
  • sewing basics
  • sewing machines
  • Shoes
  • shopping
  • singer 15-90
  • Singer 15-91
  • Singer 201
  • Singer 66
  • Singer 99K
  • Singer Featherweight
  • Singer treadle
  • topstitching
  • video
  • women I love
  • works in progress
  • YEA or NAY?

Blog Archive

  • ►  2012 (35)
    • ►  February (16)
    • ►  January (19)
  • ▼  2011 (313)
    • ►  December (24)
    • ►  November (25)
    • ►  October (20)
    • ►  September (29)
    • ►  August (21)
    • ►  July (24)
    • ►  June (22)
    • ▼  May (30)
      • Ten things I learned making a 1940's midriff
      • Cathy models the 40's midriff or "Sweetheart of th...
      • More midriff madness!
      • "Oops, I did it again!" or Peter's Latest Vintage...
      • Friday Forties Midriff Madness!
      • Reflections on My Second Year of Sewing
      • Feel the Fear...and Serge it Anyway!
      • Do You Suffer From Serger-phobia?
      • Midriffs and other Monday Musings
      • Roads Not Taken
      • Peter in Pajamas!
      • Pajama Games
      • Pajama Party Tonight!
      • FASHION POLICE 101 or "How to Tell Someone You Lov...
      • Whatever Happened to Twenties Style?
      • A Day of Rest
      • So Long, Sew-Along -- Peter & Michael's White Jean...
      • Jeans Sew-Along 10.5 -- Rivets FAIL + Gifts Galore!
      • Jeans Sew-Along 10 -- How to Make a Button Fly!
      • (Nearly) Jeans-Free Friday!
      • Jeans Sew-Along 9 -- Plodding along + CONTEST WINNER!
      • Jeans Sew-Along 8 -- Starting all over again!
      • NEWS FLASH: We interrupt this Sew-Along...!
      • Jeans Sew-Along 7 -- Finishing up!
      • Jeans Sew-Along 6 -- The Bodacious Backside
      • Jeans Sew-Along 5 -- The Fly
      • Jeans Sew-Along 4 -- Front Pockets
      • Jeans Sew-Along 3 -- Seams
      • Jeans Sew-Along 2 -- Fit
      • Jeans Sew-Along 1 -- Getting Started!
    • ►  April (28)
    • ►  March (31)
    • ►  February (28)
    • ►  January (31)
  • ►  2010 (152)
    • ►  December (30)
    • ►  November (27)
    • ►  October (31)
    • ►  September (30)
    • ►  August (23)
    • ►  July (11)
Powered by Blogger.

About Me

dvdsvdsdv
View my complete profile