


Readers, what is it about installing zipper flies that instills terror in the hearts of millions?
We are now going to vanquish that fear.
Our goals for today are:
1. Install zipper fly
2. Topstitch zipper front
3. Install zipper shield
4. Double-topstitch crotch seam allowance
Here's where we left off yesterday, with front pockets done and the outer edge of our pants fronts either serged or overcast. Those two rounded, overlapping, center protrusions are the fly extensions. You'll hear that word a lot.

NOTE: the following is not intended as a substitute for the Kwik Sew printed instructions, but rather as a further clarification. Please read the Kwik Sew instructions carefully before proceeding.
First, with right sides together, pin the front centers together (you should have marked these lines when you cut your pants fronts) and stitch the crotch seam from the inside leg to the dot.
BUT BEFORE YOU DO:
The Kwik Sew instructions neglect to tell you to finish the raw edge of the left front fly extension. (The right front fly extension will be clipped, covered with the fly shield, and their right edges lined up and overcast or serged together.)
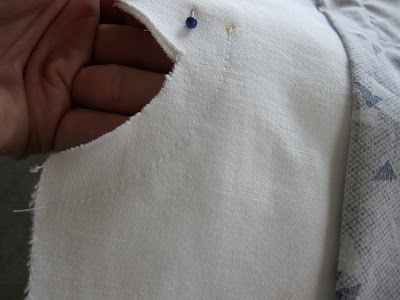
The straight, raw edge of the left front fly extension must be finished. The bottom curve will end up covered by, and stitched to, the right front fly shield, so don't worry if you can't serge the bottom of the curve with your serger; I couldn't).
This is the edge I'm talking about, with zipper attached:

Levi's left fly extension:

We now return to our zipper insertion:
The Kwik Sew 3504 instructions have you baste the center front up to the waist. I do not do this. I've folded my fly extensions back along the center front line, and pinned them, that's it.
Now you need to clip from the bottom edge of the fly extension to the stitch line, just below the dot. Don't be squeamish about clipping, please: cut up the stitch line but not through it. Good shears are essential for something like this.

Press (or finger press) the center front seam open. (A tailor's ham is useful here.)

OK, now, on the LEFT FRONT, topstitch along the edge (approx. 1/8") from the dot to the waist.


Now, follow the instructions carefully:
Place your closed zipper down on the RIGHT FRONT fly extension. The left edge of the zipper tape should be lined up with the center front. The zipper stop (the bottom point where the zipper ends) should be approx. 3/8" above the dot. Pin the zipper to the right front extension -- not through the right front of the pants, just through the extension. With a zipper foot, stitch it down, first, as close to the zipper teeth as possible, then again, approx. 1/4" from the first stitch line, for reinforcement.
If you have any questions about what's going on, examine a pair of RTW zipper fly jeans.

Here's how it looks. This pic below is the right fly extension folded out. The teeth are just at the edge of the center fold.

When you fold the extension back, it looks like this:

Now comes the part that gives people agita:
Read the instructions carefully. You're going to move the left edge of the CLOSED zipper tape (which is still free) toward the LEFT fly extension. Look at a pair of RTW jeans. You will stitch the left side of the zipper tape to the left fly extension (but not through the left front of the pants) at approximately the middle of the fly extension.
Before you stitch, make sure that there is no puckering in the front of the pants at the dot. If there is, move the zipper over a bit till it's completely flat. It should look something like this:

2. From the front of the pants, carefully topstitch along the left front fly, first at 1" and then at 1 1/4". You might want to trace this line first with chalk, or even hand baste it.
Make sure the topstitching travels below the zipper stop, because if it hits the zipper stop it will break your needle (plus you can't topstitch over it). Reinforce those bottom stitches, as this is a stress point on the pants.
Here's how it looks from the outside:

Here's how it looks from the inside:

3. Now let's make the right fly zipper shield. You've cut this piece double and the instructions have you fold it, wrong sides together and overcast the edge. If you're serging and can't easily serge that curve, here's a tip:
With right sides together, stitch along the curve at 1/4". Now clip the curve and turn the extension right side out.

Next, serge the straight edge and press.


Next, clip the right edge of the right fly extension, close to the edge of the zipper tape (This is step #7 in the instructions). Lay the zipper shield on top of the zipper and stitch the right edge of the shield "placing waist edges even and straight edge of zipper shield even with zipper tape."
Rather than serge the edges together, I simply stitched the serged right edge of my zipper shield to the right edge of the zipper tape/trimmed fly extension. (I wasn't confident the serger would be able to do this cleanly.)

Here's the result:

Next, on the outside of the right front, stitch the zipper to the shield, through all layers (not a great photo of this, sorry).

Finally, on the inside, stitch the bottom of the (right) zipper shield to the left fly extension by stitching along the curved edges, just to where the serged, straight edge of the left fly extension begins (you can see my white stitch line two pics above, just barely).
Here's the Levi's version, hardly a thing of beauty:

The Levi's 511's didn't even bother with this step, they just bartacked them together.

If you're not sure how this is supposed to work or look, refer to RTW jeans, noting how the right fly shield attaches to the left fly extension, and where.
4. Last but not least (#8 on instructions), fold the remaining crotch seam allowance toward the left front and double-topstitch from the right side (i.e., the outside). I tried to serge these seam allowances first, but it didn't come out so well. I should have done this before I attached my zipper, or maybe not a all. (This is where overcasting is superior to serging -- you can handle curves better.)

I reinforced the edge with Fray Check, and double topstitched -- not perfect but good enough.

The instructions remind you to bartack near the fly on the left front, if you haven't already. See instructions; I'm too exhausted!
Friends, there you have it -- your zipper is installed and I need a break.
Good luck, everybody!


0 comments:
Post a Comment