malepatternboldness2

  • Subscribe to our RSS feed.
  • Twitter
  • StumbleUpon
  • Reddit
  • Facebook
  • Digg
Showing posts with label Jeans Sew-Along. Show all posts

Sunday, May 15, 2011

So Long, Sew-Along -- Peter & Michael's White Jeans Photo Shoot!

Posted on 2:55 AM by dvdsvdsdv


Readers, I am sad to report that the MPB Jeans Sew-Along Express has arrived at its destination.  It's been a great ride, but it's time to deboard (which is a real word, believe it or not) so I can clean the bathrooms.

Hey!  I was alerted to this recent New York Magazine article by a well-informed, fashion-forward reader.  I do try to stay on-trend wherever possible and can you believe those prices?

Michael and I had some time to spare yesterday so, with the aid of a trusty tripod, we created a brief photo montage.  Nothing Cathy-quality here, I'm afraid -- we're just amateurs -- but the wardrobes are my creation and it felt good to don summer clothes, even in a drizzle.


Of course, our collective jeans journey continues in our Flickr group, where a slow trickle of near-finished projects is underway.  Sew-Alongers, I hope you'll light the proverbial fire under your you-know-whats in the days ahead.  None of us needs another UFO in the closet.


Will we sew-along together again here at MPB?  Most likely.  I'll keep you posted.

Enjoy, everybody, and thank you for coming along!

(As always, to see these photos full-size, please click on any image and then, in Picasa, choose "View All" in the upper left hand corner, and "Slideshow." )

Read More
Posted in Jeans Sew-Along, modeling | No comments

Saturday, May 14, 2011

Jeans Sew-Along 10.5 -- Rivets FAIL + Gifts Galore!

Posted on 7:04 AM by dvdsvdsdv


Friends, contrary to popular opinion, I am just a person.  Like you, I have my highs and my lows, my successes and my failures.  In the latter camp must go jeans rivets.  Try as I might I simply cannot manage to attach them correctly.  I can poke the hole in the fabric all right, it's everything else.

So you can imagine how galling it is to read that in Eugenia's "(fabulous) world of fashion," her stunning new jeans have perfect rivets WHICH EUGENIA ATTACHED HERSELF!  My stomach is turning as I type.

Of course, Eugenia had the assistance of something called Prym Vario Pliers, which she claims cost only £9.50 -- EUGENIA, WILL YOU PLEASE TRANSLATE THAT INTO US DOLLARS FOR THE REST OF US?  The sun does set on the British Empire you know...

Eugenia has a very overzealous legal team or I'd post a photo of her here in her perfect-fitting purple jeans -- which she made following a Pattern Review course, mind you, not the MPB Jeans Sew-Along, but whatever.  So you'll just have to trot over to Euguenia's (fabulous) world to check them out.  Grrr....

Anyway, to be honest, I don't even like rivets in my jeans, and if that sounds like sour grapes, so be it.  I didn't even know jeans had rivets until someone pointed it out to me.  I thought those were some sort of anti-theft detection device.

Friends, I am confident that Taylor Tailor will come to the rescue shortly, and that we will learn how to attach our rivets correctly.  I can't do everything.

Anyway, since there's obviously no instruction for today -- though I did hem my white jeans, which I did by simply folding under twice and topstitching -- I thought I'd talk about other things.

I have some devoted followers who send me things -- a lot of things.  Sure, it's usually when they've just returned from their Hoarders Anonymous meeting, but still.  I'd like to acknowledge their collective generosity today.

In the last month alone, I have received wonderful books...


Awesome patterns...


Fabric and notions...


And -- are you sitting down? -- SIX vintage Ken dolls!


I'm speechless and truly grateful.

But readers, lest I end up at Hoarder's Anonymous myself, I must ask that you limit your gifts to sewing machines, Liberty of London prints, and (well-wrapped) cookies.  I'm simply running out of room.  Of course, dog treats are always appreciated, sometimes by the dogs themselves.

But enough -- there's much to do today, including a double white jeans fashion shoot!

Readers near and far, I hope you have something fun planned for the weekend, whether it's sewing jeans or digging through decades of accumulated detritus.  Remember: Less is more!

Have a great day, everybody!

UPDATE: Taylor comes to the rescue:  How to insert jeans rivets.
Read More
Posted in decluttering, dolls, Jeans Sew-Along | No comments

Jeans Sew-Along 10 -- How to Make a Button Fly!

Posted on 5:31 AM by dvdsvdsdv


Much to cover today so let's get to it.  The best way to create a button fly is to look at a pair of RTW jeans and recreate one.

The button fly is essentially an additional fly shield sewn atop the left front fly extension.   From now on I will refer to this as the left fly buttonhole shield.


Remember these?  They are our right and left fly extensions as viewed from the wrong side (inside) of the pants.   (The left fly extension edge is serged; the right side will be stitched and then serged to the right fly shield.)   They are folded back at the center of your pants fronts, which you traced off your pattern piece -- or should have.


If you're unsure how I got to this point, please refer to your instructions or review last week's fly post.  Everything is the same up until the zipper installation.

I made the left fly buttonhole shield using the zipper shield pattern piece from Kwik Sew 3504, but instead of cutting it with the curved side on the fold, I did the opposite.


We want the straight edge to be a simple fold.  The side that's curved at the bottom will be serged (or overcast) and will face away from the fly.


I reinforced (or interfaced) the left fly buttonhole shield with an additional fly-shaped piece (not cut on the fold) cut perpendicular to the selvage to prevent stretching (width-wise).  With this extra fly-shaped piece inside, I then serged the curved edge.  So we're talking THREE layers of denim, two parallel to the selvage and one perpendicular.  If my denim hadn't had stretch, two layers might have been sufficient.


We want to prevent this from ever happening:


Next, I measured my left fly buttonhole shield against my RTW button fly and marked where the buttonholes should go.  Then with my Singer buttonholer attachment I made three holes.


I reinforced the holes with Fray Check, cut them open, and then stitched the left fly buttonhole shield to the left fly extension (and not through the front of the pants) along the outer curved edge.  You need to make sure the left fly buttonhole shield does not stick out beyond the front edge of the fly.  Remember how the front left fly edge is topstitched?  Keep the straight (outer) edge of the shield inside that topstitching line.


From the inside it now looks like this:


I staystitched the top.  From the outside it looks like this:


I now topstitched the left front fly (through all left layers), exactly as I did when I made my zipper fly (see Kwik Sew instructions for details).  Make sure that when you're topstitching, you're clear of the buttonholes themselves.  You can make a single row or double row of topstitching, as you prefer (Most RTW jeans have a double row).


Now let's address the right fly.

You're going to attach the right zipper shield just the way you would have if you'd sewn in a zipper, trimming the edge of the right fly extension (the piece that's part of the right front pants and folded back) at slightly less than half, and attaching the right fly shield, which you've created exactly the way you did for the zipper fly.


Recall that, with the right fly shield, the curved edge is the one cut on the fold, and the straight edge is raw (and will be serged) -- exactly the opposite of the left fly buttonhole shield.


I stitched and serged the right fly shield to the trimmed edge of the right fly extension.  I then topstitched this along the vertical front edge from the front, exactly as I would if I'd attached a zipper.  (Instead of a zipper, you'll be attaching jeans buttons.)  Refer to the Kwik Sew instructions if you're unsure of how to do this.


From the inside, the right front fly extension should extend to the edge of the left fly buttonhole shield.  Mine does not quite reach -- next time I'll make my left fly buttonhole shield a little narrower.  I may still trim that extra width.  (With white denim these details can be visible from the outside; not the case with dark denim.)


Even with RTW jeans, there's often extra width on the left fly buttonhole shield.


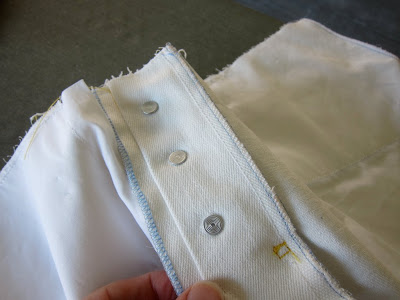
Lining up left fly buttonhole shield and right fly extension, I marked with pencil where I needed my small jeans buttons to go and attached them.


Here's how the fly looks buttoned:


And from the inside. 


Finally, you'll want to stitch the bottoms of the two shield together and bartack through all layers.


The pant are almost done -- just need to stitch up the sides and add a waistband.  He likes them!


Oh -- I haven't even mentioned my new sewing machine yet!  More about that tomorrow (short story: $20 on Craigslist) but here's a peek. 

LOVE!


Name the model and win a prize.

As always, leave your questions (rhetorical or otherwise) and comments below.

Have a great day, everybody!
Read More
Posted in Jeans Sew-Along | No comments

Wednesday, May 11, 2011

Jeans Sew-Along 9 -- Plodding along + CONTEST WINNER!

Posted on 6:12 AM by dvdsvdsdv


Not much to report today, friends.  I made decent progress on Michael's jeans yesterday, but let's face it: the second pair of white jeans is never quite as exciting as the first.  The button fly should provide some drama, however, and I expect to be reporting on that tomorrow.

Just one major oops moments so far:


Can you figure out what's wrong with this picture?  If you guessed that I attached the back yokes reversed, you'd be right!  See how in the instructions, the yokes widen at the center back seam?  Now look at mine: they narrow.  I should have referred to those instructions before I sewed the yokes on.

Don't think I don't make mistakes -- I do, and usually when I'm sewing on autopilot, which happens all the time.

Anyway, basically things are going well.  I finished the front pockets, and today will work on the fly. 


For pocketing, I'm using a densely woven white cotton shirting I had left over from an old shirt project.  Not exciting, but I was a little concerned about prints showing through the white denim.


Oh, before I forget, I must announce the winner of Monday's vintage Vogue pattern contest!

She's a New York mom with her own line of kids baby doll carriers for sale in her Etsy store.... 

Put your hands together for Suzanne B!


I've never had a New Yorker win a contest before, and isn't it about time?

Suzanne, please send me your mailing address (peterlappinnyc at gmail dot com) and I'll get your pattern off to you ASAP.  Or if you're in the neighborhood, swing by, and I'll toss it out the window to you.

Congratulations!

Friends, that's it for today.  I'm a little hung over, if you must know, after celebrating my blog-follower milestone with Michael last night at a lovely Austrian restaurant in the neighborhood.  No celebrity sightings, but we did manage to polish off an entire bottle of wine (Tuesday it's BYOB night!).

Have a great day, everybody!

P.S.  If you have an oops moment you wish to share, please do so below.   Don't we all secretly thrill at hearing about others' sewing mistakes -- or is it just me?

Read More
Posted in Jeans Sew-Along | No comments
Older Posts Home
Subscribe to: Posts (Atom)

Popular Posts

  • Positively the (next to) LAST faux fur coat post!
    Friends, they say all good things must come to an end, but honestly, I could keep working on this coat forever.  And not because it's su...
  • Requisite Halloween Post
    I don't think it's too early, do you? I recognize Halloween is a subject of relevance only to Americans (or so I believe); my apol...
  • MPB Men's Boxers Sew-Along 3 -- Let's Start Sewing!
    Good morning, Sew-Alongers and others eager to learn how to make boxers.  Today we are going to start sewing!  Yesterday I neglected to ment...
  • "Bling-a-Ding-Ding" - Faux Fur Coat Update!
    Friends, if you're like me you have poor impulse control.  That's why I'm just going to go ahead and show you how my faux fur Se...
  • Can you see my butt crack?
    Readers, today I'm going to challenge your sense of decorum and tolerance.  The easily offended might want to come back tomorrow. Oh wis...
  • Glitzy Fabrics and the Sewing Headache
    Readers, I am happy to announce that the top (I'm calling it a jacket) that goes with my Halston-inspired outfit, Simplicity 7295, is al...
  • Happiness is a Clean Sewing Table
    This may not look like anything to brag about to you, neat readers, but for me this is as good as it gets.  I can actually see the table und...
  • Dress Silhouettes Gone Wrong + POLL!
      Readers, do you believe in objective truth?  Do some ideas live in the universal mind and transcend both history and geography?  Are some ...
  • 70's Faux Fur Coat MUSLIN + Tools at the ready!
    I just finished my muslin, readers, and that little voice inside is already asking, Do we really have to do this all over again in faux fur?...
  • Men in their Underwear
    WARNING: The following post deals with adolescent themes.  Anyone over the age of 18 should be accompanied by a child. Friends, on this cold...

Categories

  • 20s glamour
  • 30s glamour
  • 40s glamour
  • 50s glamour
  • 60s glamour
  • 70s
  • age and aging
  • beauty
  • body art
  • books
  • button loops
  • Cathy
  • clothing and culture
  • completed projects
  • contests
  • crinoline
  • Daily Ditch (The)
  • decluttering
  • dime store psychology
  • dogs
  • dolls
  • Doris Day
  • fabric
  • fashion show
  • faux fur
  • flea market
  • Ginger Rogers
  • Guy week
  • Hats
  • interfacing
  • ironing
  • Jeans Sew-Along
  • Kenmore 158.1040
  • makeovers
  • Men's Boxers Sew-Along
  • men's fit issues
  • Men's Shirt Sew-Along
  • mens bathing suit
  • mens fashion
  • mens grooming
  • mens jeans
  • mens pajamas
  • mens pants
  • mens patterns
  • mens shirt
  • mens suit
  • mens toggle coat
  • mens underwear
  • mens western jacket
  • modeling
  • mothers
  • movies
  • MPB Day
  • my life
  • pattern drafting
  • patterns
  • Peter on video
  • Pfaff 30
  • project planning
  • sergers
  • sewing and culture
  • sewing basics
  • sewing machines
  • Shoes
  • shopping
  • singer 15-90
  • Singer 15-91
  • Singer 201
  • Singer 66
  • Singer 99K
  • Singer Featherweight
  • Singer treadle
  • topstitching
  • video
  • women I love
  • works in progress
  • YEA or NAY?

Blog Archive

  • ▼  2012 (35)
    • ▼  February (16)
      • Positively the (next to) LAST faux fur coat post!
      • Pocket Love + Don't Call Me!
      • MPB Valentine's Day Wishes!
      • "Bling-a-Ding-Ding" - Faux Fur Coat Update!
      • Fervently fighting faux fur fatigue!
      • Further Fur Coat Adventures!
      • 70's Faux Fur Coat MUSLIN + Tools at the ready!
      • Faux Fur Fabric Haul and MORE!
      • The Coat Project: friend or faux?
      • Random Thoughts about Seventies Coats
      • Glitzy Fabrics and the Sewing Headache
      • Men in their Underwear
      • Glitzy Halston-inspired outfit UPDATE!
      • Puttin' on the Glitz!
      • Farewell, Pfaff 30, etc.
      • Valentine's Day Sewing -- YEA or NAY?
    • ►  January (19)
  • ►  2011 (313)
    • ►  December (24)
    • ►  November (25)
    • ►  October (20)
    • ►  September (29)
    • ►  August (21)
    • ►  July (24)
    • ►  June (22)
    • ►  May (30)
    • ►  April (28)
    • ►  March (31)
    • ►  February (28)
    • ►  January (31)
  • ►  2010 (152)
    • ►  December (30)
    • ►  November (27)
    • ►  October (31)
    • ►  September (30)
    • ►  August (23)
    • ►  July (11)
Powered by Blogger.

About Me

dvdsvdsdv
View my complete profile