malepatternboldness2

  • Subscribe to our RSS feed.
  • Twitter
  • StumbleUpon
  • Reddit
  • Facebook
  • Digg
Showing posts with label Men's Boxers Sew-Along. Show all posts

Tuesday, October 11, 2011

MPB Men's Boxers Sew-Along 6 -- So Long, Sew-Along!

Posted on 7:21 AM by dvdsvdsdv

Readers, there's an old show business adage: Leave them wanting more.  In that spirit, I have decided that today we will formally end the MPB Men's Boxers Sew-Along. 

Today, I'm going to show you the second pair of boxers I completed, which is, aside from a few minor differences, very much like the first.  Once again, I used McCall's 3438, my vintage Seventies underwear pattern.  If you can get your hands on this pattern, which does show up on sites like eBay and Etsy with some frequency, I highly recommend it.  For my body type, it's ideal.


This time, I decided to make View C (the light blue shorts second from the right) which has a plain hemmed bottom with a side vent.

You can see the difference between the two patterns here.  My earlier pattern, with the rounded leg, is on top, and my current pattern on the bottom.  They're nearly identical.


I started making these on my Kenmore 158.141 zigzagger before realizing that I could get far superior results on any of my straight stitch machines.  This is because turning curves and topstitching are much easier to accomplish on a straight stitch machine, and you never have to worry about your fabric getting sucked down into the needle hole. 


I made these exactly the way I made my earlier striped boxers.  Here's how I finished the inside of the right fly facing. I decided not to add a separate facing after all.


Here's the fly from the outside.


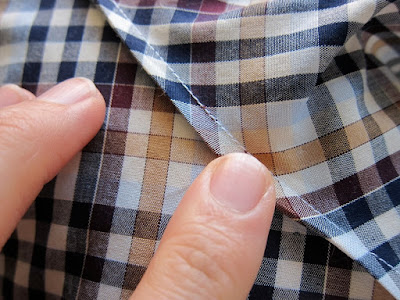
I flat-felled all my major seams.  I noticed that some of you are using a mock flat-felled seam and serging your inside raw seam allowances.  Totally fine. 


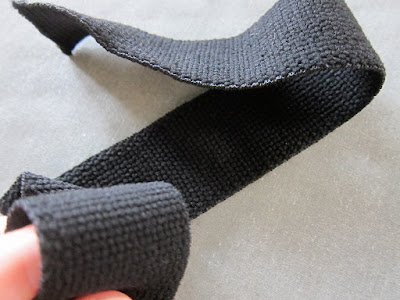
This time I used a very soft woven elastic that I could only find in black at Daytona Trimming on West 39th St.  (They didn't have waistband elastic this soft at Pacific Trim, and the prices seemed much higher there.)  I paid about $1.25/yd.


Here's the finished vent, which I completed after hemming the legs.  I did both by just rolling up the hem 1/8" and then rolling again roughly 1/4" and edgestitching.  Nothing fancy.  A bar tack at the top of the vent will make the top of the vent point stronger, if you care to add one.


Here are the finished boxers, which couldn't be more comfortable.


I love my new boxers -- in fact, I'm wearing them as I write this!  (You can see the other pair of boxers I made here.)

If you haven't posted your finished boxers in our Flickr group yet, please do.  I'm very impressed with what I've seen so far.  Great job, Sew-Alongers!  I'll still be answering boxers-related questions there too.

On an unrelated note, after debating what to do with my old stereo equipment, I decided that I was not ready to ditch it.  But since I don't have -- or want -- large speakers anymore, I will compromise, and listen to my records on my stereo headphones.  That way I can still enjoy my old records, collected over more than than two decades, without annoying Michael.


How lovely to reconnect with Vic Damone after all these years!


And that, friends, is that.

What's next here at MPB?  Tune in and find out!

Have a great day, everybody!

Read More
Posted in Men's Boxers Sew-Along | No comments

Friday, October 7, 2011

MPB Men's Boxers Sew-Along 5 -- Crossing the Finish Line!

Posted on 5:53 AM by dvdsvdsdv


Friends, we've almost completed our first pair of boxers, do you believe it?!

I realized yesterday that we never did sew up the crotch seam together.  This is a very important seam to complete (for obvious reasons) and it should be done before any bias trim is added.   The seam extends from the bottom of one leg to the other.  I used a flat-felled seam (see Post 3 for an explanation of how to make one).

In this pic, it's the horizontal seam running left to right (the vertical seam runs up to the fly).


Now let's finish up for real:

Our goals for today are:

1. Measure length of elastic waistband and stitch ends together. 

2.  Divide elastic, pin to boxers and stitch.

3. Turn elastic to inside and stitch four (or how ever many you prefer) rows of parallel stitching.

1. If there's one thing I can't stand, it's a tight waistband.  Cut your waistband elastic to your preferred length, and stitch the band closed, leaving approximately 1/2 inch seam allowances.  You'll want the seam allowance to end up on the wrong side of the elastic (and finished waistband), so if your elastic has a right and wrong side, make sure you stitch this seam with right sides together.


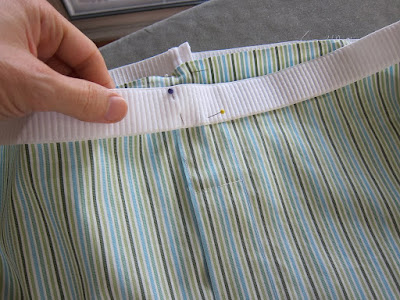
2.  Here's how my McCall's 3438 pattern has me attach the waistband: first I divide the elastic in quarters, and mark each quarter with pins.  I then pin my elastic to the top of my boxers -- wrong side of elastic to right side of boxers -- lapping the elastic 3/8" over the top edge.


Remember that you're going to have to pull the elastic taut to pin it in place and when you release it the shorts will bunch up.  Be patient.  This is the hardest part -- for me, at least -- of making this kind of waistband (as opposed to making a casing and running the elastic through it).


What I found helpful was to pin the elastic to my boxers at six or more points (pin vertically so the pins don't pop out when you stretch the elastic like mine did), making sure that the "pull" of the elastic is roughly the same between pins.  If it isn't, you'll have uneven bunching, i.e., more gathers in the back than in front (or vice versa).

Place your elastic band seam at the center back.  When you're comfortable with your elastic placement, stitch along the bottom edge, stretching the elastic between the pins as you stitch. 


Some machines have an easier time with this than others.  Make sure that as you stitch, the elastic is pulled taut on either end, but let the feed dogs move the elastic away from you.


3.  Next, you are going to turn the attached elastic to the inside of your boxers.  Leave about 1/8" of fabric visible above the folded elastic.  This way, the top edge of the elastic won't peek out over the outside of your boxers.


Now stitch along the top edge, the bottom edge, and through the center.  I actually divide the width of my band in quarters, sewing four parallel lines of stitches.  You'll want to pull the elastic taut as you stitch, just as you did in Step 2.  Since the elastic is already attached to your boxers, however, this is much easier.  I sew my last two lines of stitching from the right side (outside) of the waistband; it's easier to see the white thread.


Friends, we are now done!  Make sure there are no hanging threads anywhere and check your work.  How do things look?

I love my new boxers!


One of the things I like most about this pair is the trim cut.  Since I stopped wearing my sagger jeans, I like a slimmer look.


Readers, we may be done with these boxers, but the MPB Men's Boxers Sew-Along continues.

I'm going to make a different style of boxers next,  and maybe another pair after that.  Once I'm warmed up, there's no stopping me!

Here's a sneak peak of what's ahead:


Some cool-looking boxers are showing up  in our Flickr group.  Have you posted yours yet?

Have a great day, everybody!
Read More
Posted in Men's Boxers Sew-Along | No comments

Thursday, October 6, 2011

MPB Men's Boxers Sew-Along 4 - The Joy of Bias Tape!

Posted on 6:38 AM by dvdsvdsdv


One of the things I love about leading Sew-Alongs, friends, is that I learn new techniques along with you.  I've cut my own bias tape before, but I don't think I've ever used it to decorate the visible edge of a garment.  Today, I'm going to show you how to do it!

Your boxers pattern may not call for this kind of edge finish, but you can add it anyway, or use single fold bias tape for another garment in the future.

Our goals for today are:

1.  Cut bias strips (or tape) from our fashion fabric.

2.  Stitch bias tape onto boxer leg edge.

3.  Finish bias trim by stitching "in the ditch," and close side seams of our boxers.

1.  To cut my tape, I use a plastic triangle, one edge of which I line up with my selvage.  This ensures that I'm cutting my fashion fabric at a 45 degree angle, or along the true bias.


The fact that my fabric has a vertical stripe makes the process easier.  Can you use commercial bias tape?  In theory, yes, but the only tape I've ever seen is coarse cotton poly (Wright's) and much too stiff for a project like this.

There happens to be a binding strip pattern piece in my boxers pattern (actually for a tee shirt) but you certainly don't need a pattern to cut 1½" strips, just a ruler.


I measure each 1½" strip, and cut it out with a rotary cutter.  Since none of these is quite long enough for my project, I stitch a few together to make a longer piece of tape.


2.  Here are the McCall's 3438 directions for attaching the bias binding.  If you click on the pic, you can supersize it.


One step I do differently, is that I attach my binding in two steps, essentially as one would attach a waistband.  In the first step, I stitch the binding from the front of the boxers, right sides (of fabric) together, at approximately 1/4" from the edge.  The wider your seam allowance, the wider your binding will appear.


3.  I then fold the binding over the top of the edge, and fold it under on the inside (or wrong side) of the boxer leg, so that the edge of the folded-under binding edge is slightly lower than my first, outer edge.  The reason for this is that when we "stitch in the ditch" -- i.e., stitch in the crease directly under the binding fold on the boxers front -- we catch the folded-under binding on the inside.  Does that make sense?

Notice that the binding is a little narrower on the outside, and a little wider on the inside:


Notice, too, that there is no visible stitch line on the front of the binding.  I think this looks more elegant.


Apart from these steps, I stitch on the binding just as the directions say.  At a certain point, you're going to be encasing the second side of the boxer leg, and you'll be binding over both sides together.  If it helps, you can pin or baste the side seam edges first.  When you've completed that step, you'll want to topstitch the binding flat, as you would a flat-felled seam. 

Why reinvent the wheel?  -- here are the rest of the instructions for this step:


You may be wondering if I pre-press my binding.  I do not find it necessary to pre-press -- the bias tape folds evenly and I usually just eyeball it --  but pre-pressing could be helpful.  What I find most important is to check, as I stitch "in the ditch," to make sure that I am catching the folded-under bias tape on the inside of the boxers.

 I reinforce the point where the legs meet -- you can make a bar tack (satin stitch) with your zigzagger, or just stitch back and forth a few times, if you're using a straight stitch machine, like me.


Friends, tomorrow we insert our elastic waistband, and then we'll be done with our first pair of boxers!

I hope those of you sewing along are making good progress.  I see some projects turning up in our  Flickr group, and they look great.  You certainly don't have to model them.

Have a great day, everybody!
Read More
Posted in Men's Boxers Sew-Along | No comments

Wednesday, October 5, 2011

MPB Men's Boxers Sew-Along 3 -- Let's Start Sewing!

Posted on 7:09 AM by dvdsvdsdv


Good morning, Sew-Alongers and others eager to learn how to make boxers.  Today we are going to start sewing!  Yesterday I neglected to mention thread, assuming that everybody already had the thread they need.  As you can see above, I was choosing from among an assortment of potential thread colors, finally choosing...white.   Sigh.
Our goals for today are:

1. Prepare our sewing machine for our new project.

2. Attach two front pieces (left and right) at center seam (below fly area).

3. Sew our first (ever?) flat-felled seam.

4. Working on our two front pieces, create our fly.

1. This may seem obvious, but before I start any new project, I like to make sure my machine is ready.  This means cleaning out any fuzz that might have accumulated around the feed dogs from earlier projects, making sure the thread I want to use is in my bobbin and my needle, and that I'm using the right needle for the project.  For a tightly-woven cotton shirting like the one I'm using, I like to sew with a #9 or #11 needle.  I use standard Coats & Clark thread -- nothing fancy. 


2.  The first thing most boxer pattern instructions have you do is create the front fly, and mine is no different.  Are your instructions similar?


Rather than baste the two center fronts together (as illustrated), I simply pin them together.  I skip the part about reinforcing the edge by stitching on either side of the dotted seam line.  Can anyone explain how this helps?


Instead, I stitch my first seam, the center front, from the dot (which I've marked in pencil) on down.  The seam allowance on these boxers is just 3/8".   We then clip the seam allowance (on a slight diagonal) to the dot.  You really need to clip all the way to the dot -- sharp-tipped shears are a necessity.  Here's my stitch line (my finger is where the dot is):


Now I clip:


3.  We're going to finish this center front seam by making a flat-felled seam.  Working from the wrong side of the fabric, I trim the left front seam allowance down to 1/8".  I then fold the right seam allowance over the left.   (You can do this with an iron or more easily with your finger, depending on your fabric.)


Finally, I turn the folded right edge down, encasing the narrower left seam allowance, and edgestitch (or topstitch) along the edge of my seam, using my straight stitch foot.


The result is a very strong seam.


Usually on men's shirts, the flat-felled seams are sewn on the wrong side of the shirt.  On men's jeans, it's on the outside.  It doesn't make a whole lot of difference!

4. Now on to the fly.  There is no separate fly facing on these McCall's boxers.  Working from the inside, the left fly is simply that left front "extension" folded back along the designated fold line; the raw edge is folded under approximately 1/4", and stitched down.  NOTE: This stitch line will be visible from the front of the boxers.


The right front extension is folded back less deeply (just 1") and also turned under 1/4" and stitched.


I found finishing the bottom of my right extension cleanly to be a challenge.  If I made these again, I'd cut a separate, wider facing, which would fully cover the bottom of the right fly facing and be easier to finish cleanly.  Mine ended up looking like this and I think it looks messy, though the stitching isn't visible on the front of the boxers since the left fly is lapped over the right. 


My RTW Jockeys have a much cleaner inside fly finish.


It looks like the right front has a longer, deeper fly extension than the left (it's not a separate facing).  I'll address this issue in more detail later in the sew-along.  For now, follow the directions for your pattern.  If you'd like, you can even post them in our Flickr group, here!  I'd love to see how they're different from mine and how they address the inside right fly facing.

Finally, matching the center fronts (which were marked on the pattern), we lap left fly over right, and stitch through all layers.


Friends, that's it for today!  Tomorrow we'll move on, and I'll even show you how to cut bias binding!

Happy sewing, everybody!
Read More
Posted in Men's Boxers Sew-Along | No comments
Older Posts Home
Subscribe to: Posts (Atom)

Popular Posts

  • Positively the (next to) LAST faux fur coat post!
    Friends, they say all good things must come to an end, but honestly, I could keep working on this coat forever.  And not because it's su...
  • Requisite Halloween Post
    I don't think it's too early, do you? I recognize Halloween is a subject of relevance only to Americans (or so I believe); my apol...
  • MPB Men's Boxers Sew-Along 3 -- Let's Start Sewing!
    Good morning, Sew-Alongers and others eager to learn how to make boxers.  Today we are going to start sewing!  Yesterday I neglected to ment...
  • "Bling-a-Ding-Ding" - Faux Fur Coat Update!
    Friends, if you're like me you have poor impulse control.  That's why I'm just going to go ahead and show you how my faux fur Se...
  • Can you see my butt crack?
    Readers, today I'm going to challenge your sense of decorum and tolerance.  The easily offended might want to come back tomorrow. Oh wis...
  • Glitzy Fabrics and the Sewing Headache
    Readers, I am happy to announce that the top (I'm calling it a jacket) that goes with my Halston-inspired outfit, Simplicity 7295, is al...
  • Dress Silhouettes Gone Wrong + POLL!
      Readers, do you believe in objective truth?  Do some ideas live in the universal mind and transcend both history and geography?  Are some ...
  • Happiness is a Clean Sewing Table
    This may not look like anything to brag about to you, neat readers, but for me this is as good as it gets.  I can actually see the table und...
  • 70's Faux Fur Coat MUSLIN + Tools at the ready!
    I just finished my muslin, readers, and that little voice inside is already asking, Do we really have to do this all over again in faux fur?...
  • Men in their Underwear
    WARNING: The following post deals with adolescent themes.  Anyone over the age of 18 should be accompanied by a child. Friends, on this cold...

Categories

  • 20s glamour
  • 30s glamour
  • 40s glamour
  • 50s glamour
  • 60s glamour
  • 70s
  • age and aging
  • beauty
  • body art
  • books
  • button loops
  • Cathy
  • clothing and culture
  • completed projects
  • contests
  • crinoline
  • Daily Ditch (The)
  • decluttering
  • dime store psychology
  • dogs
  • dolls
  • Doris Day
  • fabric
  • fashion show
  • faux fur
  • flea market
  • Ginger Rogers
  • Guy week
  • Hats
  • interfacing
  • ironing
  • Jeans Sew-Along
  • Kenmore 158.1040
  • makeovers
  • Men's Boxers Sew-Along
  • men's fit issues
  • Men's Shirt Sew-Along
  • mens bathing suit
  • mens fashion
  • mens grooming
  • mens jeans
  • mens pajamas
  • mens pants
  • mens patterns
  • mens shirt
  • mens suit
  • mens toggle coat
  • mens underwear
  • mens western jacket
  • modeling
  • mothers
  • movies
  • MPB Day
  • my life
  • pattern drafting
  • patterns
  • Peter on video
  • Pfaff 30
  • project planning
  • sergers
  • sewing and culture
  • sewing basics
  • sewing machines
  • Shoes
  • shopping
  • singer 15-90
  • Singer 15-91
  • Singer 201
  • Singer 66
  • Singer 99K
  • Singer Featherweight
  • Singer treadle
  • topstitching
  • video
  • women I love
  • works in progress
  • YEA or NAY?

Blog Archive

  • ▼  2012 (35)
    • ▼  February (16)
      • Positively the (next to) LAST faux fur coat post!
      • Pocket Love + Don't Call Me!
      • MPB Valentine's Day Wishes!
      • "Bling-a-Ding-Ding" - Faux Fur Coat Update!
      • Fervently fighting faux fur fatigue!
      • Further Fur Coat Adventures!
      • 70's Faux Fur Coat MUSLIN + Tools at the ready!
      • Faux Fur Fabric Haul and MORE!
      • The Coat Project: friend or faux?
      • Random Thoughts about Seventies Coats
      • Glitzy Fabrics and the Sewing Headache
      • Men in their Underwear
      • Glitzy Halston-inspired outfit UPDATE!
      • Puttin' on the Glitz!
      • Farewell, Pfaff 30, etc.
      • Valentine's Day Sewing -- YEA or NAY?
    • ►  January (19)
  • ►  2011 (313)
    • ►  December (24)
    • ►  November (25)
    • ►  October (20)
    • ►  September (29)
    • ►  August (21)
    • ►  July (24)
    • ►  June (22)
    • ►  May (30)
    • ►  April (28)
    • ►  March (31)
    • ►  February (28)
    • ►  January (31)
  • ►  2010 (152)
    • ►  December (30)
    • ►  November (27)
    • ►  October (31)
    • ►  September (30)
    • ►  August (23)
    • ►  July (11)
Powered by Blogger.

About Me

dvdsvdsdv
View my complete profile