malepatternboldness2

  • Subscribe to our RSS feed.
  • Twitter
  • StumbleUpon
  • Reddit
  • Facebook
  • Digg
Showing posts with label works in progress. Show all posts

Wednesday, February 15, 2012

Pocket Love + Don't Call Me!

Posted on 5:48 AM by dvdsvdsdv


So much to cover today, friends!

First the big news.  For the first time in my life I have no land line telephone service (and no 212 area code).  Since both Michael and I have cell phones, and now that we have cable Internet (we needed the land line for our lousy DSL), we decided to turn it off.  Since I rarely received calls on my land line anymore, it doesn't feel very different, but the event does warrant memorializing, don't you think?

Do you still have a land line?

In other news, we decided to skip the V-Day party last night.  For one thing, it started too late, and I won't tell you how late to avoid embarrassing myself.  I'm an early-to-bed, early-to-rise type, readers, and I hate to have my routine disrupted.  Also, the coat (the coat! the coat!) isn't done yet.  And it won't be done for a few days yet.  We'll do a Cathy photo shoot on Saturday combining faux fur coat and black sequined pantsuit (remember that one?), maybe even featuring a few guest celebrities!  Do you know any?

Right now, I'm trying to track down a bottle of Charlie to create the right uber-Seventies mood.

Now on to the coat.  Yesterday was all about slit pockets.  (For those just joining us, I've been following Kenneth King's instructions from an online faux fur coat-making class he led on Pattern Review a few years ago.)  Here's how I made the pockets.

First, I couldn't conceal them in a seam, because the side seam of the coat is all the way back behind the arm (common with a two piece sleeve, I believe), as opposed to being directly under it.  You can see that seam here, though I hope to brush it out a bit more:


After deciding where I wanted my pockets to go, I drew the pocket line on the inside of the coat and marked the ends with cold tape.


For the pocket bag, I used a pattern piece from an old Simplicity coat pattern I own.  (I chose a 7" pocket opening based on the pattern piece.)  This is an easy pattern piece to find, or you can trace one yourself.  I cut the pockets out of some stretch poly satin from my remnant stash.


From the inside of the coat, I stuck a pin through the front of the coat at each end of the pocket.  On the outside, I lined a ruler up between the protruding pins, and with combs, I parted my fur.  I then taped the fur down on either side of the part.  I used electrical tape because that was what I had.  Whatever tape you use (King suggests masking tape), make sure you test it on your fur first -- you don't want gummy residue or any damage to the fur.


Now, on the wrong side (inside) of the garment, I centered a piece of grosgrain ribbon over my pocket line, and stitched it down along the length of the pocket.  My ribbon was a little wider than necessary, but it was all I had.  Plus it was pink!


On the right side, you will now place the two sides of your pocket bag, one side at a time.  The pocket piece seam allowance will be placed over the center pocket stitch line, and then stitched -- from the wrong side, of course -- in a stitch line parallel to, but 1/8" to the side of, the center stitch line.  On the outside of the coat, the seam allowance will be pinned back temporarily (before the next pocket side can be attached).


I stitched down the other side of the pocket in the same way, only with a stitch line on the other side of the center stitch line.  (Don't worry about the stitches getting caught in the tape; the tape will be pulled off and is just to keep most of the hair out of the way.)

Here's what it looks like from the front (ideally, both seam allowances will be the same width, but this is OK).


On the inside, you now have three stitch lines: a center line, marking where the pocket will be slit, and two stitch lines on either side, holding either side of the pocket bag in place. 


You will now slit through the coat along the center stitch line, from the inside.  (As you can see, this is very much like making a welt pocket.)   I did this with an X-Acto knife -- highly recommended.


Keep the "V" cut at the end narrow: we don't need room for welts.
Now pull the pocket back through to the inside.  NOTE: you are not creating welts.  You are simply creating a pocket bag that covers the raw edges of the coat pocket.  The pocket lining does not show from the outside of the coat.

The inside side of the pocket (which will end up closest to the coat) will be prick stitched along the edge.  You can't press fur, and this will hold the pocket and pocket opening in place.  The stitching goes through all layers.


The seam allowance of the outer side of the pocket (the one that will show) is stitched down with a running stitch.  This is just to keep things tidy and in place.


You can now stitch the two sides of the pocket bag together with your machine.  When you're done, stitch down the pocket with a catch stitch.  Here's how mine looked.  Not perfect, perhaps, but for me, this is pretty good!


And here's the pocket from the outside:


NOTE:  It is VERY important that before you attach your pocket pieces, you know exactly how they'll look pulled through to the back, so that 1) they're facing in the correct direction, and 2) the side you want on the outside of the pocket ends up there.  This can be a bit of a mind twister, but can't be skipped.

My second pocket was better than my first and I'm sure my eighth would be better than my seventh, but whatever.  The beauty is that from the outside, slight imperfections don't show-- such is the miracle of faux fur. 

I hope this is helpful to those of you eager to add slit pockets to a faux fur coat you're making, or maybe wanting to add pockets to Grandma's old mink!

OK, folks, no rest for the weary.  Time to get to work.

Have a great day, everybody!
Read More
Posted in faux fur, works in progress | No comments

Monday, February 13, 2012

"Bling-a-Ding-Ding" - Faux Fur Coat Update!

Posted on 11:51 AM by dvdsvdsdv


Friends, if you're like me you have poor impulse control.  That's why I'm just going to go ahead and show you how my faux fur Seventies coat looked earlier today, right after I performed the "turn of the cloth" (flipping the facings to the front), revealing my very understated feral cat lapels and collar.

There's still a bit of understitching to do to keep things in place, but I think you'll agree this coat makes a statement.  Having grown up in the Seventies in the Bronx of all places, a coat like this has strong associations and I'm not talking about my childhood best friend Maury's mother Francine.  Though come to think of it, I'm pretty sure Francine had a coat very similar to mine.  If she didn't, she should have.

She did drive a Ford LTD -- or was it her ex husband's -- which would definitely go with the coat.


I'm not sure how much interest you have in the construction of this coat anymore, but I'll share a few things I think warrant mention.  First, slightly off topic, the dogs just love sitting in my faux fur scrap pile and I think they're trying to tell me they want faux fur coats too.  Dream on, boys.


Since my leopard-y print (What is this cat print exactly?) was rather thin in comparison to the sheared pink rabbit, I padded the collar and lapel pieces to give them extra oomph.  I basted some beige fleece I had in my remnant stash and I'm so glad I did; it really makes a difference.  The fleece is trimmed so it doesn't get caught in my seam allowances, as one would interfacing.


I also padded both front lapels.


I didn't add grosgrain ribbon or twill tape along the fold line; I don't think it's necessary though I might change my mind; we'll see how my energy holds up.

I attached my overcollar to my right and left front facings, which were already attached to the neck facing.  I then stitched the whole kit and kaboodle to the coat itself, having already attached the undercollar, trimmed seam allowances, and turned them up.


Having shaved my seam allowances on the sheared rabbit fur side, my seams were very manageable and neat.  They ended up getting trimmed down to about 3/8" or less anyway.


As always, I've been vacuuming as I go, and when I remember it, I put on my face mask.  It gives Michael a good laugh if nothing else.

I'm nowhere near done, of course.  One thing I left for last was pockets, because I wasn't sure if I wanted slit pockets or patch pockets.  The original pattern calls for patch pockets and it's doable in this fur; I just have to think about how it will look.  If you have an opinion about it, let me know before I start cutting/slitting etc!

I also wanted to line the coat, though frankly, the inside looks a lot like shearling and isn't offensive to me at all. I could simple bind my facing edges, hems, etc., and call it a day.  Thoughts?  Also, how about the cuffs and/or hem?  Should I add the cat fur there too, or is the collar/lapels plenty? 

Have a great day, everybody!

PS - What's a good name for this coat?  Be kind!

Read More
Posted in faux fur, works in progress | No comments

Sunday, February 12, 2012

Fervently fighting faux fur fatigue!

Posted on 2:22 PM by dvdsvdsdv


Readers, where did the weekend go?  I can't speak for you, but mine was spent fondling five pounds of fuzzy faux fur.

I'm not complaining though, because miracle of miracles, this fuzz is beginning to look like a coat!


My underlayers are basically done with the exception of staying the lapel fold line and a few other tailoring tasks.  Tomorrow I'll attach the facings.

I've stitched so many hinge seams I could do it in my sleep.


My vintage Kenmore 158.141 has proven to be an indefatigable friend.  This is actually the first garment I've sewn on it and it has certainly earned its place in my sewing machine collection, not to mention it's a handy computer table too!

Up top I'm basting in my sleeves.  Once they were set, I hinge-seamed them in with my Kenmore.


Today I also cut my facings and collars.  Those will be straight stitched on.  The seam allowances on the pink rabbit fur have to be shaved.  My beard trimmer (which is also my head shaver) has been indispensable here, but it needs lots of cleaning and oiling; trimming those seam allowances is a big job and the fur is superfine and very thick and creates lots of fine fuzz.

Here's the undercollar with the seam allowances shaved down.


I also had to shave the seam allowances on the neck of the coat.


I'm still vacuuming up a storm.  Goodness knows what the neighbors think I'm up to.

And that's been my weekend, folks.  I know this is not going to be the last faux fur garment I make; I really like working with it.  It's toasty and surprisingly light, and fortunately, doesn't have to be pink!

Enjoy the rest of your weekend, everybody, and happy sewing!
Read More
Posted in faux fur, works in progress | No comments

Saturday, February 11, 2012

Further Fur Coat Adventures!

Posted on 3:18 PM by dvdsvdsdv


Friends, the coat is coming along.  I cut all my shaggy white fur (sheared pink rabbit, for want of a better name) today: fronts, backs and sleeves.  Wanna see one of my sleeves -- undersleeve and oversleeve -- all sewn up?  

Ta da!


Here's the back with the two darts cut and stitched closed with a hinge seam (the dart shape is sliced out before the seam is stitched).


From the front, you'd never know there were two darts there!


Here's another dart cut out from the front.  As you can see, it produces a lot of loose hair.


I have been vacuuming like a mad person; my apartment is going to be cleaner at the conclusion of this project than at the start.  It's the only way to keep things in order.

I've been cutting my white fur, which has a suede-like bonded backing, with an X-Acto knife.  It slices only the backing and doesn't damage the fur itself.  Scissors and especially a rotary cutter would cut too much of the fur off, and since most of my pieces don't have seam allowances, I want to preserve the fur along the edges.  Ideally, seams are next to invisible.


As soon as I cut a big section, out comes the vacuum, and you have to vacuum both your garment piece as well as the edges of all the fur that's left behind.  It moves quickly but you have to stay on top of it. 

I've also been experimenting with facing edges, which will be straight stitched with a standard seam allowance.  Before stitching, however, the seam allowance on both the white fur and the spotted fur will have to be shaved down completely.


In this sample, you can see that the seam allowance of both furs is nearly hair-free.


Once the facings are turned, to keep edges sharp, I'll have to understitch the top and bottom layers of fur.  (You can't press faux fur, obviously.)  Right side up, the fur should look something like this on the lapel.  The underside will be the white rabbity fur.


The cat (leopard?) fur is weird.  I don't know if was stored improperly and got wrinkled or if it's intentionally made so that the nap in some places is somewhat whorled.  I like the look but I actually don't think it's supposed to be that way.  I tried rinsing and drying a small piece, however, and it still had those whorls -- you can sort of see them in the upper right hand corner of this photo.  Either way, I can live with it.  


Friends, that's all for today.  Needless to say this project is taking up the lion's share of my weekend but it's also a fun adventure and I'm learning a lot.  As with so many things, tackling it has demystified the process, and Kenneth King's instructions have proved invaluable.  But you MUST vacuum constantly!

Happy Saturday, everybody!

Read More
Posted in faux fur, works in progress | No comments

Friday, February 10, 2012

70's Faux Fur Coat MUSLIN + Tools at the ready!

Posted on 9:56 AM by dvdsvdsdv


I just finished my muslin, readers, and that little voice inside is already asking, Do we really have to do this all over again in faux fur?
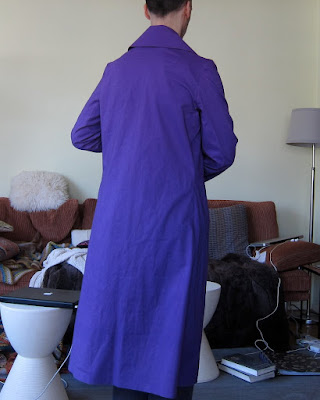
I wasn't going to make a muslin at first, but since most of the major seams will be done hinge-seam style (more about that later), as per Kenneth King's instructions, I won't be cutting seam allowances.  I wanted to make sure this coat was going to fit.  Thankfully, it does, and there's a very comfortable amount of ease.  I made this with some cheap, coarse purple cotton I had in my stash.

From the back, with undercollar up.


Collar down.  I removed the back pleat.


Straight front without belt.


I only added the facing to the right side (which you see folded on top); on the left side you're just looking at the front piece only, but you get the idea.  The only challenge was the notched collar -- if you've ever made one you know why: all those seams intersecting at that one little dot and all the careful clipping of seam allowances required.

I'm uncertain about the length the coat should be.  Believe it or not, this is the intermediate length -- it could have been a maxi coat.  I do love this pattern!


Meanwhile, I've amassed all my recommended tools, face mask included -- you don't want to inhale all those hair fragments and dust (Kenneth King recommends using one) -- and started experimenting with the fur.  Below I am also armed with my hair clippers, which I'll use to trim seam allowances on the collar and facings; those won't have hinge seams.


Here are some of my other tools, including awl (that pointy, pin-like thing), afro pick and assorted combs, and cold tape.
 

The cold tape is a sturdy, highly adhesive fabric tape that's used to stay fur seams.  It will be added to the top seam edges before I stitch.  I found a roll at Greenberg & Hammer, the notions store, before they closed.


A basic seam is stitched right sides (i.e fur sides) together, with the reinforced seam on top.  Before stitching, you use your pick to push as much fur as you can into the seam.

Then you zigzag along (falling slightly off) the edge, like overcasting, and gently pull the two sides apart so that the seam lies flat.  ( I'm doing project this on my Kenmore 158.141, the one in the table.)


After a little combing, the seam is invisible from the front.


If you don't push the fur out of the seam first, you end up with something like this.  Bad.


BTW, a regular straight stitched seam, without any trimming at all, would look like this -- a mess. 


Of course, another necessary tool is a vacuum cleaner.  Working with this fur creates a lot of loose hair along cut edges.  Here's a seam allowance I shaved with my clippers.  See all that hair?  This is not a project for the anal compulsive.


My fur, while not the shaggiest out there, is much trickier to deal with than the plush fur in my Salvation Army coat from yesterday.  Look how much shorter the nap is on that -- more like polyfleece.


Friends, if truth be told, I'm a little anxious about getting started but I'm trying to breath deeply (through my face mask, of course) and relax.  It's not sable, after all.

A happy Friday to you all!
Read More
Posted in faux fur, works in progress | No comments
Older Posts Home
Subscribe to: Posts (Atom)

Popular Posts

  • Positively the (next to) LAST faux fur coat post!
    Friends, they say all good things must come to an end, but honestly, I could keep working on this coat forever.  And not because it's su...
  • Requisite Halloween Post
    I don't think it's too early, do you? I recognize Halloween is a subject of relevance only to Americans (or so I believe); my apol...
  • MPB Men's Boxers Sew-Along 3 -- Let's Start Sewing!
    Good morning, Sew-Alongers and others eager to learn how to make boxers.  Today we are going to start sewing!  Yesterday I neglected to ment...
  • Can you see my butt crack?
    Readers, today I'm going to challenge your sense of decorum and tolerance.  The easily offended might want to come back tomorrow. Oh wis...
  • Dress Silhouettes Gone Wrong + POLL!
      Readers, do you believe in objective truth?  Do some ideas live in the universal mind and transcend both history and geography?  Are some ...
  • Glitzy Fabrics and the Sewing Headache
    Readers, I am happy to announce that the top (I'm calling it a jacket) that goes with my Halston-inspired outfit, Simplicity 7295, is al...
  • Glitzy Halston-inspired outfit UPDATE!
    Friends, it takes a certain kind of man to pull off a 1975 sequined pantsuit.  Fortunately, I am precisely that kind of man. I'm not qui...
  • Happiness is a Clean Sewing Table
    This may not look like anything to brag about to you, neat readers, but for me this is as good as it gets.  I can actually see the table und...
  • "Bling-a-Ding-Ding" - Faux Fur Coat Update!
    Friends, if you're like me you have poor impulse control.  That's why I'm just going to go ahead and show you how my faux fur Se...
  • 70's Faux Fur Coat MUSLIN + Tools at the ready!
    I just finished my muslin, readers, and that little voice inside is already asking, Do we really have to do this all over again in faux fur?...

Categories

  • 20s glamour
  • 30s glamour
  • 40s glamour
  • 50s glamour
  • 60s glamour
  • 70s
  • age and aging
  • beauty
  • body art
  • books
  • button loops
  • Cathy
  • clothing and culture
  • completed projects
  • contests
  • crinoline
  • Daily Ditch (The)
  • decluttering
  • dime store psychology
  • dogs
  • dolls
  • Doris Day
  • fabric
  • fashion show
  • faux fur
  • flea market
  • Ginger Rogers
  • Guy week
  • Hats
  • interfacing
  • ironing
  • Jeans Sew-Along
  • Kenmore 158.1040
  • makeovers
  • Men's Boxers Sew-Along
  • men's fit issues
  • Men's Shirt Sew-Along
  • mens bathing suit
  • mens fashion
  • mens grooming
  • mens jeans
  • mens pajamas
  • mens pants
  • mens patterns
  • mens shirt
  • mens suit
  • mens toggle coat
  • mens underwear
  • mens western jacket
  • modeling
  • mothers
  • movies
  • MPB Day
  • my life
  • pattern drafting
  • patterns
  • Peter on video
  • Pfaff 30
  • project planning
  • sergers
  • sewing and culture
  • sewing basics
  • sewing machines
  • Shoes
  • shopping
  • singer 15-90
  • Singer 15-91
  • Singer 201
  • Singer 66
  • Singer 99K
  • Singer Featherweight
  • Singer treadle
  • topstitching
  • video
  • women I love
  • works in progress
  • YEA or NAY?

Blog Archive

  • ▼  2012 (35)
    • ▼  February (16)
      • Positively the (next to) LAST faux fur coat post!
      • Pocket Love + Don't Call Me!
      • MPB Valentine's Day Wishes!
      • "Bling-a-Ding-Ding" - Faux Fur Coat Update!
      • Fervently fighting faux fur fatigue!
      • Further Fur Coat Adventures!
      • 70's Faux Fur Coat MUSLIN + Tools at the ready!
      • Faux Fur Fabric Haul and MORE!
      • The Coat Project: friend or faux?
      • Random Thoughts about Seventies Coats
      • Glitzy Fabrics and the Sewing Headache
      • Men in their Underwear
      • Glitzy Halston-inspired outfit UPDATE!
      • Puttin' on the Glitz!
      • Farewell, Pfaff 30, etc.
      • Valentine's Day Sewing -- YEA or NAY?
    • ►  January (19)
  • ►  2011 (313)
    • ►  December (24)
    • ►  November (25)
    • ►  October (20)
    • ►  September (29)
    • ►  August (21)
    • ►  July (24)
    • ►  June (22)
    • ►  May (30)
    • ►  April (28)
    • ►  March (31)
    • ►  February (28)
    • ►  January (31)
  • ►  2010 (152)
    • ►  December (30)
    • ►  November (27)
    • ►  October (31)
    • ►  September (30)
    • ►  August (23)
    • ►  July (11)
Powered by Blogger.

About Me

dvdsvdsdv
View my complete profile