malepatternboldness2

  • Subscribe to our RSS feed.
  • Twitter
  • StumbleUpon
  • Reddit
  • Facebook
  • Digg
Showing posts with label men's fit issues. Show all posts

Tuesday, May 3, 2011

Jeans Sew-Along 2 -- Fit

Posted on 7:02 AM by dvdsvdsdv

I like to think I'm a very open-minded person, but in many ways I'm quite traditional and jeans fit is one of the ways.   Unless you're dancing around a pole, please keep your appendectomy scar covered.

You've probably heard that the high-waisted look is coming back, primarily for gals but it's only a matter of time for us guys.  On a certain type of figure I like this look.  It's also the one I grew up with.


How jeans should fit is a personal question and better hashed out in our Jeans Sew-Along Flickr group.  Age, body type, lifestyle, and personality all come into play here.   Personally, I find jeans that come up to my true waist to feel confining, especially when I sit down.  I prefer my jeans to hit approximately 3" below my navel, give or take 1".


I'm more particular about where the back waistband hits.  I'm 5'7", which is considered short here in the USA, and if the rise is too high in back, I think it really shortens me and also looks dated.  Way out West, where someone might conceivably be sitting on a horse (or a mechanical bull), this look is still in vogue. 

Too high for me (These are a 30" x 30" -- Helmut Lang via the dumpster):


I prefer this fit (these are Levi 511's, also 30" x 30") though they reveal a bit of love handle and cut me in the seat.
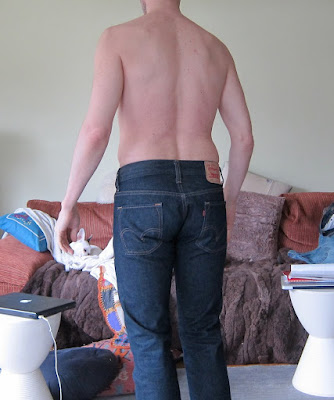


These Banana Republic jeans, ALSO size 30" x 30", are both too big and too high.  Commercial sizing means nothing these days.


More about fit below; let's move on.

Our goals for today are:

1. Take your basic pants measurements: waist (true waist or jeans-height waist), hips, inseam, rise (crotch to waist).  Do you know which jeans pattern size you'll be using?

2. Trace and/or cut your pattern pieces, making necessary adjustments to them. 

 3. Test needles and thread on your jeans fabric.

*****

1.  Did you try on your jeans yesterday like I asked you to?  Do you have a sense of what looks and feels good with regard to fit?

Let's take our basic measurements.

My true waist is about 30".  But I don't wear my jeans up there, as you already know.


My "jeans" waist is roughly 33".  But I know from experience that this does not mean I should cut the size Medium jeans: I'd swim in those.  I'll still cut the Small, but I may give myself a little extra room through the hips; I'll probably do this by narrowing the seam allowance a bit when I sew.


My hips are about 37" -- still within Small range according to the KS pattern, but barely.


This is the way I measure my rise; not sure if it's orthodox but it works for me.  From top of back waistband down under to front top of waistband, we're talking 22".  I'll also measure the distance from center crotch seam (where the flat-felled seams intersect) to both top of front waistband and top of back waistband on a pair of pants (whose fit I like) themselves and check that against the pattern.


Your inseam is from that inside crotch point down to where you want the bottom of your pants to go.  Better too long than too short as jeans will shrink a bit.  I only hem after multiple dryings.

2.  Basic adjustments to pattern pieces.  On the Kwik Sew pattern (and most patterns) there are designated places (horizontal lines) where you make changes if you're lengthening/shortening the legs and/or rise.  If you're tracing your pattern pieces, please include this line too.

I've made pants where I thought, well, I'll just make the changes to the rise when I'm attaching the waistband.  Then I ended up with side pockets too narrow to fit my hands inside.

Remember these?  I could maybe squeeze in three fingers.


Remember, too, that adjustments made in the fly area will have to me made to all other pattern pieces that intersect that area.
 
3. This is the time to experiment with thread and needles.

Yesterday I bought my topstitching thread at Sil Thread.  You can order from them online, did you know that?  They have 200 colors!


I tested it using my Featherweight and it works great.  You want something thick enough to show up well but not so thick as too screw up your sewing machine.  I sew jeans with a size 14 or 18 needle -- it's a stronger needle for thicker fabrics and the eye is large enough to accommodate thicker thread.


Test your needle and thread with multiple layers of denim.  Make sure your machine is up to the task.

Friends, I think that's enough for today, don't you?  Tomorrow we'll start cutting fabric.  A few of you have recommended pre-shrinking denim more than once and that sounds like a good idea, especially if you routinely dry you jeans in the dryer.

All sorts of fun conversations are going on in the Flickr group -- check it out!

See you all tomorrow!
Read More
Posted in Jeans Sew-Along, men's fit issues | No comments

Wednesday, February 16, 2011

Men's Shirt Sew-Along 15 -- Addressing FIT: The Sloping Shoulder

Posted on 7:36 AM by dvdsvdsdv


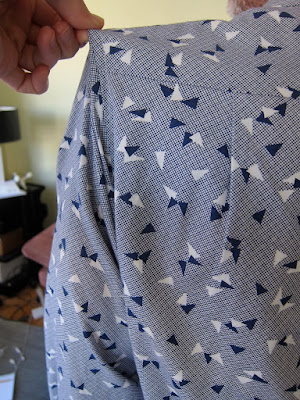
Friends, one of the alterations I need on nearly every commercial shirt pattern I use is a sloping shoulder adjustment.  See that big diagonal crease running from my left shoulder to my left armhole?  You'll see it on nearly all my shirts, on both sides.

Most men's shirt patterns are drafted for a squarer shoulder than mine.  My shoulders are also slightly rounded forward.


In the first photo up top, I'm wearing one of my many versions of a favorite vintage pattern from the Seventies, Butterick 4712.  I really wanted to adjust this pattern to fit better.


Now it's very difficult to address fit on oneself.  I have had the privilege this month to work with the esteemed designer, teacher, writer, and fellow flea market devotee, Kenneth King.  Kenneth recently contributed a series of articles specifically on fit for Threads in 2010.


I wore my shirt to Kenneth's studio, which is just about a mile from my apartment, and brought my pattern along too.  Kenneth immediately recognized my primary fit issue.  He pinned out the deep diagonal crease on my shoulder to form an elongated, marquise diamond-shaped dart, whose width he carefully measured and transferred to the armhole.  The shoulder is subsequently lowered the same amount.

This extra fabric becomes what Kenneth refers to as a "net loss."  In other words, that extra fabric is being eliminated from the pattern.

The method he used is described in his article, "A New Approach to Fitting," from the February/March 2010 issue of Threads.

It's a wonderful article.  Here's a quote you may find helpful:

"To start this process, make a muslin, put it on, and begin to pin out any fullness and unevenness to form a nice smooth silhouette.  For garments that hang from the shoulders, adjust the muslin from the top down, as lower drag lines often disappear or diminish after the upper adjustments are made."


I want to share the alteration Kenneth made to my shirt pattern, one you can do yourselves, through Kenneth's method or others.  These kind of sloping shoulder, rounded shoulder, narrow shoulder adjustments are described in every fitting book, including Fit For Real People, which I featured yesterday.

One note: FFRP suggests that any sloping shoulder adjustment made in back must also be made in front -- at least as I understand the photo on p. 160.  Kenneth maintains that the adjustment should be made only where it's needed.   To paraphrase: if you have diagonal creases (like mine) in back, address those.  If you have diagonal creases in front, address those.  If you have both, make the alteration in both front and back.

Remember: Shoulder and armhole are adjusted equally here.


Some detailed shots below.  The size of the armhole doesn't change, nor does the yoke or front.


To compensate for the loss of length in back, he added additional length to the back piece so the back wouldn't be longer than the front.


My next goal is to make a new version of the shirt with the altered pattern and see what else -- if anything -- needs to be done.  You may need to make a few muslins to work your fit issues (think art, not science).  Even a master doesn't always get it on the first try, especially when multiple alterations are necessary, each one affecting the next.

As always, you can bring your specific fit questions to our increasingly colorful Flickr group, and we'll try to work them out. 

Have a great day, everybody!
Read More
Posted in men's fit issues, Men's Shirt Sew-Along | No comments

Tuesday, February 15, 2011

Men's Shirt Sew-Along 14 -- Addressing FIT

Posted on 6:34 AM by dvdsvdsdv


Friends, as our Men's Shirt Sew-Along, enters its third week, it's (finally) time to address fit.

As I've mentioned previously, the only shirt pattern alterations I'd made before this Sew-Along were to shorten sleeves and bodice length.  Not that other alterations might not have been called for, I simply didn't know how my shirts should/could fit.

I probably sewed twenty shirts with many of the same fit issues

Remember too: not all men's shirts are fitted shirts.  Many men -- and women -- prefer a fuller shirt, especially in a casual style like the Colette Negroni.  

Fit is very much a matter of personal preference and the process of fitting is as much an art as a science.  Very few people are going to match the standard body measurements printed on the commercial pattern (sob) and we differ in countless individual ways.


I have yet to find a sewing book that addresses fitting for men to my satisfaction.  But there are a number of good fitting books for women and if you think of men as flat-chested women with no hips and bigger biceps, you can see that many of the fit issues are similar, if not the garments themselves.

One book I've purchased that came highly recommended is the Pati Palmer and Marta Alto classic, Fit for Real People.

Fit for Real People has a lot of information about fitting shoulder and backs in particular, which seems to be where many of our shirt fitting challenges lie.  They also address specifically alterations to garments with a back yoke.


Yes, it is a women's fit book.  But I am finding it extremely helpful.


With so many Sew-Along participants, as well as a variety of men's shirt patterns being used, I've found our Flickr group to be the best forum to discuss individual fit questions.  

We are fortunate to have some very experienced fitters among us in our Sew-Along as well as some very good fit-related resources posted in our Flickr discussion area.  Some of us learn best from photos, some prefer videos, some need in-person instruction. 

What seems to be working best so far is to post a photo of your muslin, or completed shirt, on the person who will be wearing it and solicit feedback.

You guys are doing a wonderful job on your projects and  I'm seeing some beautiful shirts coming together.

We'll be tackling some specific fit issues here this week, but if there are any specifics you'd like me to address, please let me know.

Happy sewing -- and fitting -- everybody!
Read More
Posted in men's fit issues, Men's Shirt Sew-Along | No comments
Older Posts Home
Subscribe to: Posts (Atom)

Popular Posts

  • Positively the (next to) LAST faux fur coat post!
    Friends, they say all good things must come to an end, but honestly, I could keep working on this coat forever.  And not because it's su...
  • Requisite Halloween Post
    I don't think it's too early, do you? I recognize Halloween is a subject of relevance only to Americans (or so I believe); my apol...
  • MPB Men's Boxers Sew-Along 3 -- Let's Start Sewing!
    Good morning, Sew-Alongers and others eager to learn how to make boxers.  Today we are going to start sewing!  Yesterday I neglected to ment...
  • "Bling-a-Ding-Ding" - Faux Fur Coat Update!
    Friends, if you're like me you have poor impulse control.  That's why I'm just going to go ahead and show you how my faux fur Se...
  • Can you see my butt crack?
    Readers, today I'm going to challenge your sense of decorum and tolerance.  The easily offended might want to come back tomorrow. Oh wis...
  • Glitzy Fabrics and the Sewing Headache
    Readers, I am happy to announce that the top (I'm calling it a jacket) that goes with my Halston-inspired outfit, Simplicity 7295, is al...
  • Happiness is a Clean Sewing Table
    This may not look like anything to brag about to you, neat readers, but for me this is as good as it gets.  I can actually see the table und...
  • Dress Silhouettes Gone Wrong + POLL!
      Readers, do you believe in objective truth?  Do some ideas live in the universal mind and transcend both history and geography?  Are some ...
  • 70's Faux Fur Coat MUSLIN + Tools at the ready!
    I just finished my muslin, readers, and that little voice inside is already asking, Do we really have to do this all over again in faux fur?...
  • Men in their Underwear
    WARNING: The following post deals with adolescent themes.  Anyone over the age of 18 should be accompanied by a child. Friends, on this cold...

Categories

  • 20s glamour
  • 30s glamour
  • 40s glamour
  • 50s glamour
  • 60s glamour
  • 70s
  • age and aging
  • beauty
  • body art
  • books
  • button loops
  • Cathy
  • clothing and culture
  • completed projects
  • contests
  • crinoline
  • Daily Ditch (The)
  • decluttering
  • dime store psychology
  • dogs
  • dolls
  • Doris Day
  • fabric
  • fashion show
  • faux fur
  • flea market
  • Ginger Rogers
  • Guy week
  • Hats
  • interfacing
  • ironing
  • Jeans Sew-Along
  • Kenmore 158.1040
  • makeovers
  • Men's Boxers Sew-Along
  • men's fit issues
  • Men's Shirt Sew-Along
  • mens bathing suit
  • mens fashion
  • mens grooming
  • mens jeans
  • mens pajamas
  • mens pants
  • mens patterns
  • mens shirt
  • mens suit
  • mens toggle coat
  • mens underwear
  • mens western jacket
  • modeling
  • mothers
  • movies
  • MPB Day
  • my life
  • pattern drafting
  • patterns
  • Peter on video
  • Pfaff 30
  • project planning
  • sergers
  • sewing and culture
  • sewing basics
  • sewing machines
  • Shoes
  • shopping
  • singer 15-90
  • Singer 15-91
  • Singer 201
  • Singer 66
  • Singer 99K
  • Singer Featherweight
  • Singer treadle
  • topstitching
  • video
  • women I love
  • works in progress
  • YEA or NAY?

Blog Archive

  • ▼  2012 (35)
    • ▼  February (16)
      • Positively the (next to) LAST faux fur coat post!
      • Pocket Love + Don't Call Me!
      • MPB Valentine's Day Wishes!
      • "Bling-a-Ding-Ding" - Faux Fur Coat Update!
      • Fervently fighting faux fur fatigue!
      • Further Fur Coat Adventures!
      • 70's Faux Fur Coat MUSLIN + Tools at the ready!
      • Faux Fur Fabric Haul and MORE!
      • The Coat Project: friend or faux?
      • Random Thoughts about Seventies Coats
      • Glitzy Fabrics and the Sewing Headache
      • Men in their Underwear
      • Glitzy Halston-inspired outfit UPDATE!
      • Puttin' on the Glitz!
      • Farewell, Pfaff 30, etc.
      • Valentine's Day Sewing -- YEA or NAY?
    • ►  January (19)
  • ►  2011 (313)
    • ►  December (24)
    • ►  November (25)
    • ►  October (20)
    • ►  September (29)
    • ►  August (21)
    • ►  July (24)
    • ►  June (22)
    • ►  May (30)
    • ►  April (28)
    • ►  March (31)
    • ►  February (28)
    • ►  January (31)
  • ►  2010 (152)
    • ►  December (30)
    • ►  November (27)
    • ►  October (31)
    • ►  September (30)
    • ►  August (23)
    • ►  July (11)
Powered by Blogger.

About Me

dvdsvdsdv
View my complete profile